The purpose of this guide is to walk you through building your first data stream. A sample scenario will be used to create a use case for your data stream. Before you begin, make sure that all the prerequisites are met and then follow the steps carefully.
Prerequisites
The prerequisites below has to be met before continuing with this article. Please note that some of the requirements for this article may already have been set up by your administrator and can be skipped over.
- Data Stream Designer should be fully installed and set up. For instructions on how to install the system, refer to this article.
- You have to have the appropriate rights in Data Stream Designer.
- A stream host needs to be installed and available for use. To install a stream host, refer to these instructions.
- During this guide, you will be required to use three agents: an MQTT listener, filter transformation, and an E-mail action agent. To acquire these agents, please contact your XMPro sales representative or write to us at [email protected].
- We will be using MQTT in this example, for which you have to install MQTT.fx. If you are unfamiliar with MQTT, please refer to their website for more information.
Scenario
Consider having a machine in an underground mine. This machine needs to have its temperature monitored. As soon as the temperature of the machine gets too high, a notification needs to be sent to a person with the machine’s temperature so that that person can make a decision to lower the temperature or shut it down.
In our data stream, we are also going to simulate the values from the temperature sensor using MQTT (the values would be posted to MQTT and then we would retrieve them) and then check the temperature to make sure that it does not get too high. If the temperature exceeds 120oC, we are going to send an E-mail to a person that needs to make sure that the temperature of the machine does not exceed a certain threshold. This person can then, based on the E-mail, decide to cool the machine down or completely turn it off. Please note that the data stream that we are going to build is an example to build your understanding in how to build a stream and will have to be modified before using it in a real-life situation.
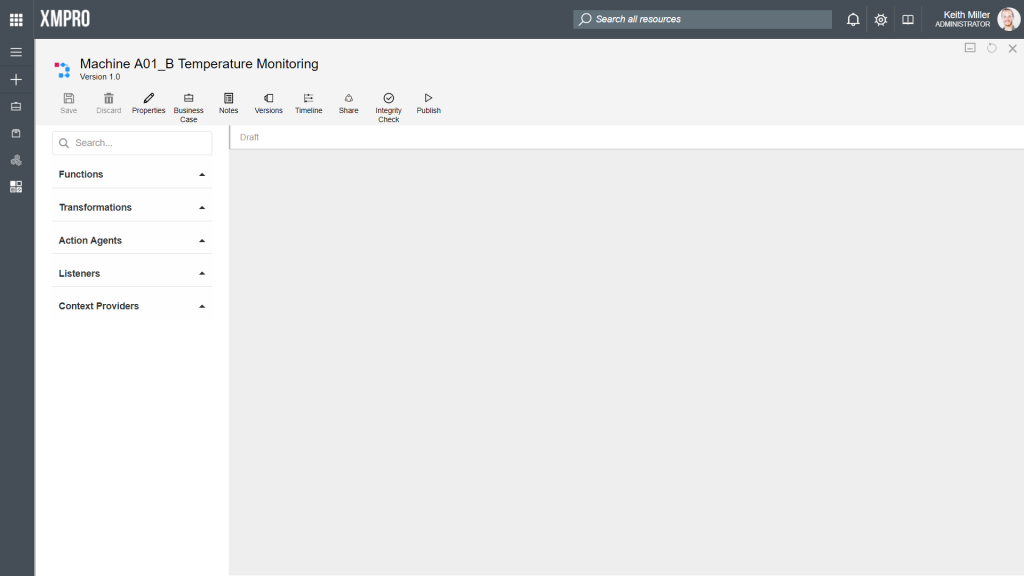
Create a use case
Firstly, we need to create a use case in which the data stream will be built. You can see this use case as a container for the data stream. By creating a use case, more functionality will become available to you to help you in the process of building data streams, such as adding a business case or notes.
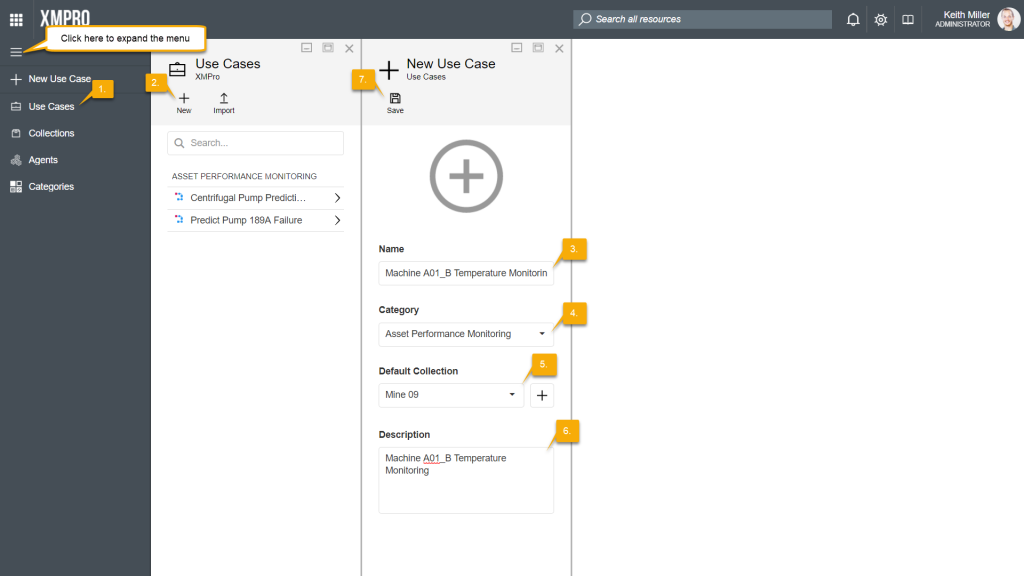
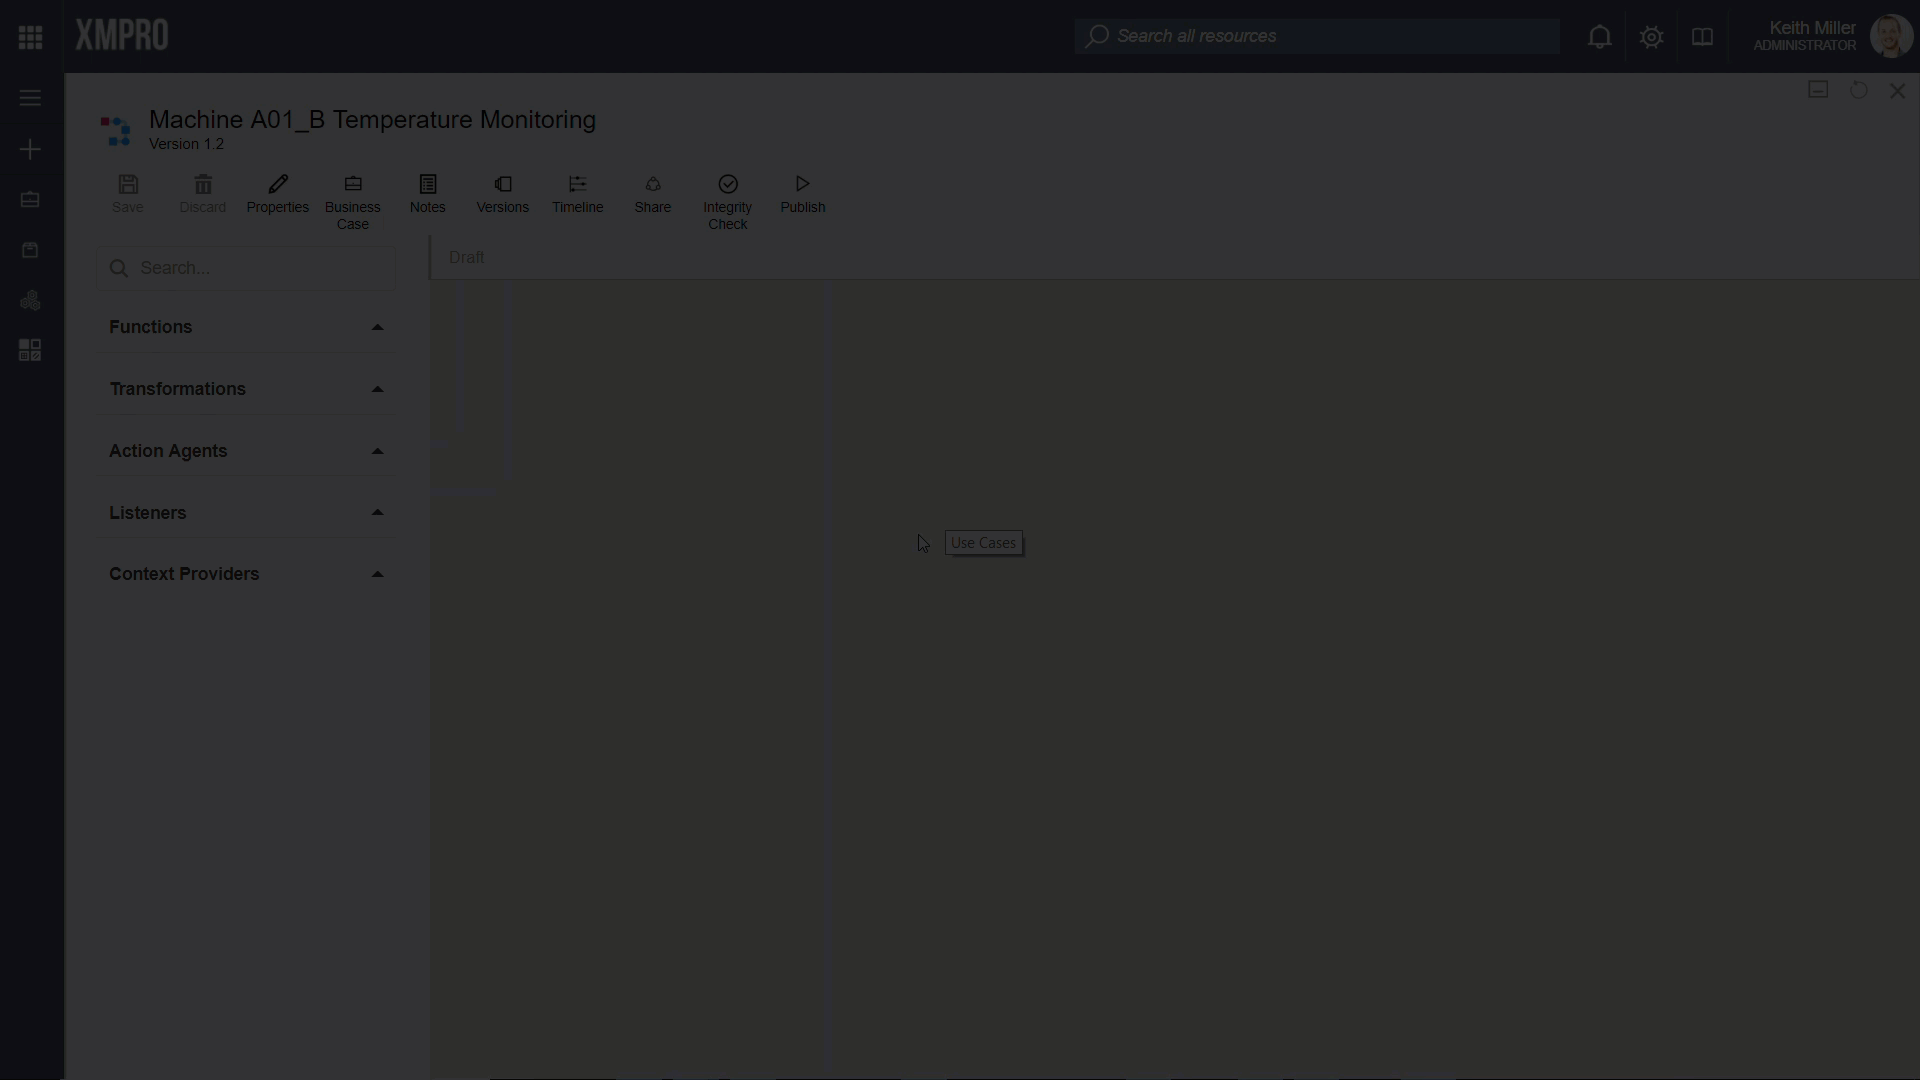
- Open the Use Cases page from the left-hand menu. You can either hover over the menu images or click on the hamburger-icon to expand the menu and then select “Use Cases“.
- Click on “New“.
- Choose an appropriate name for your data stream. In our example, the data stream is named “Machine A01_B Temperature Monitoring“.
- Select the category to which your data stream should belong.
- Choose collection for your data stream. The collection that you choose here will be used as the default collection, meaning that all agents in your data stream will use this collection unless you change it to allow a specific agent to use a different collection.
- Add a description for your data stream.
- Click “Save“. An empty canvas, allowing you to start creating your data stream, will automatically open.
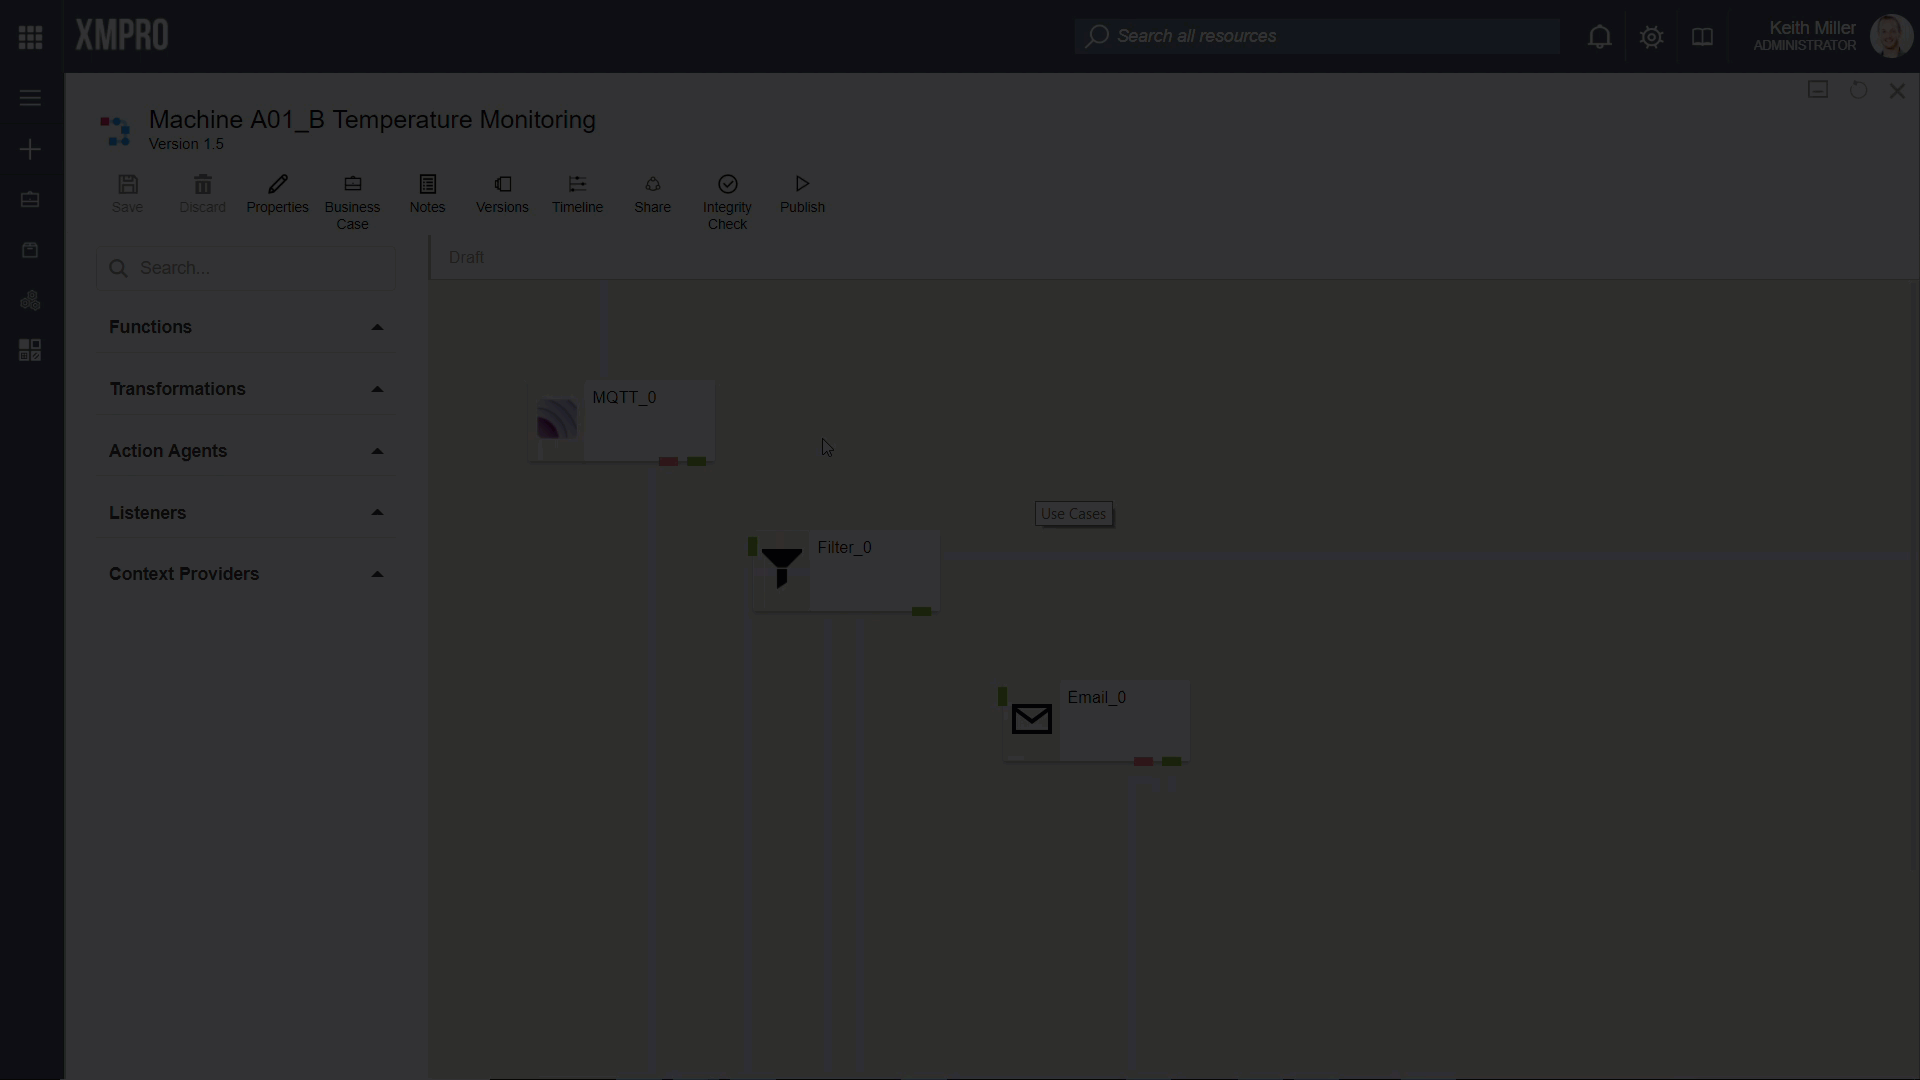
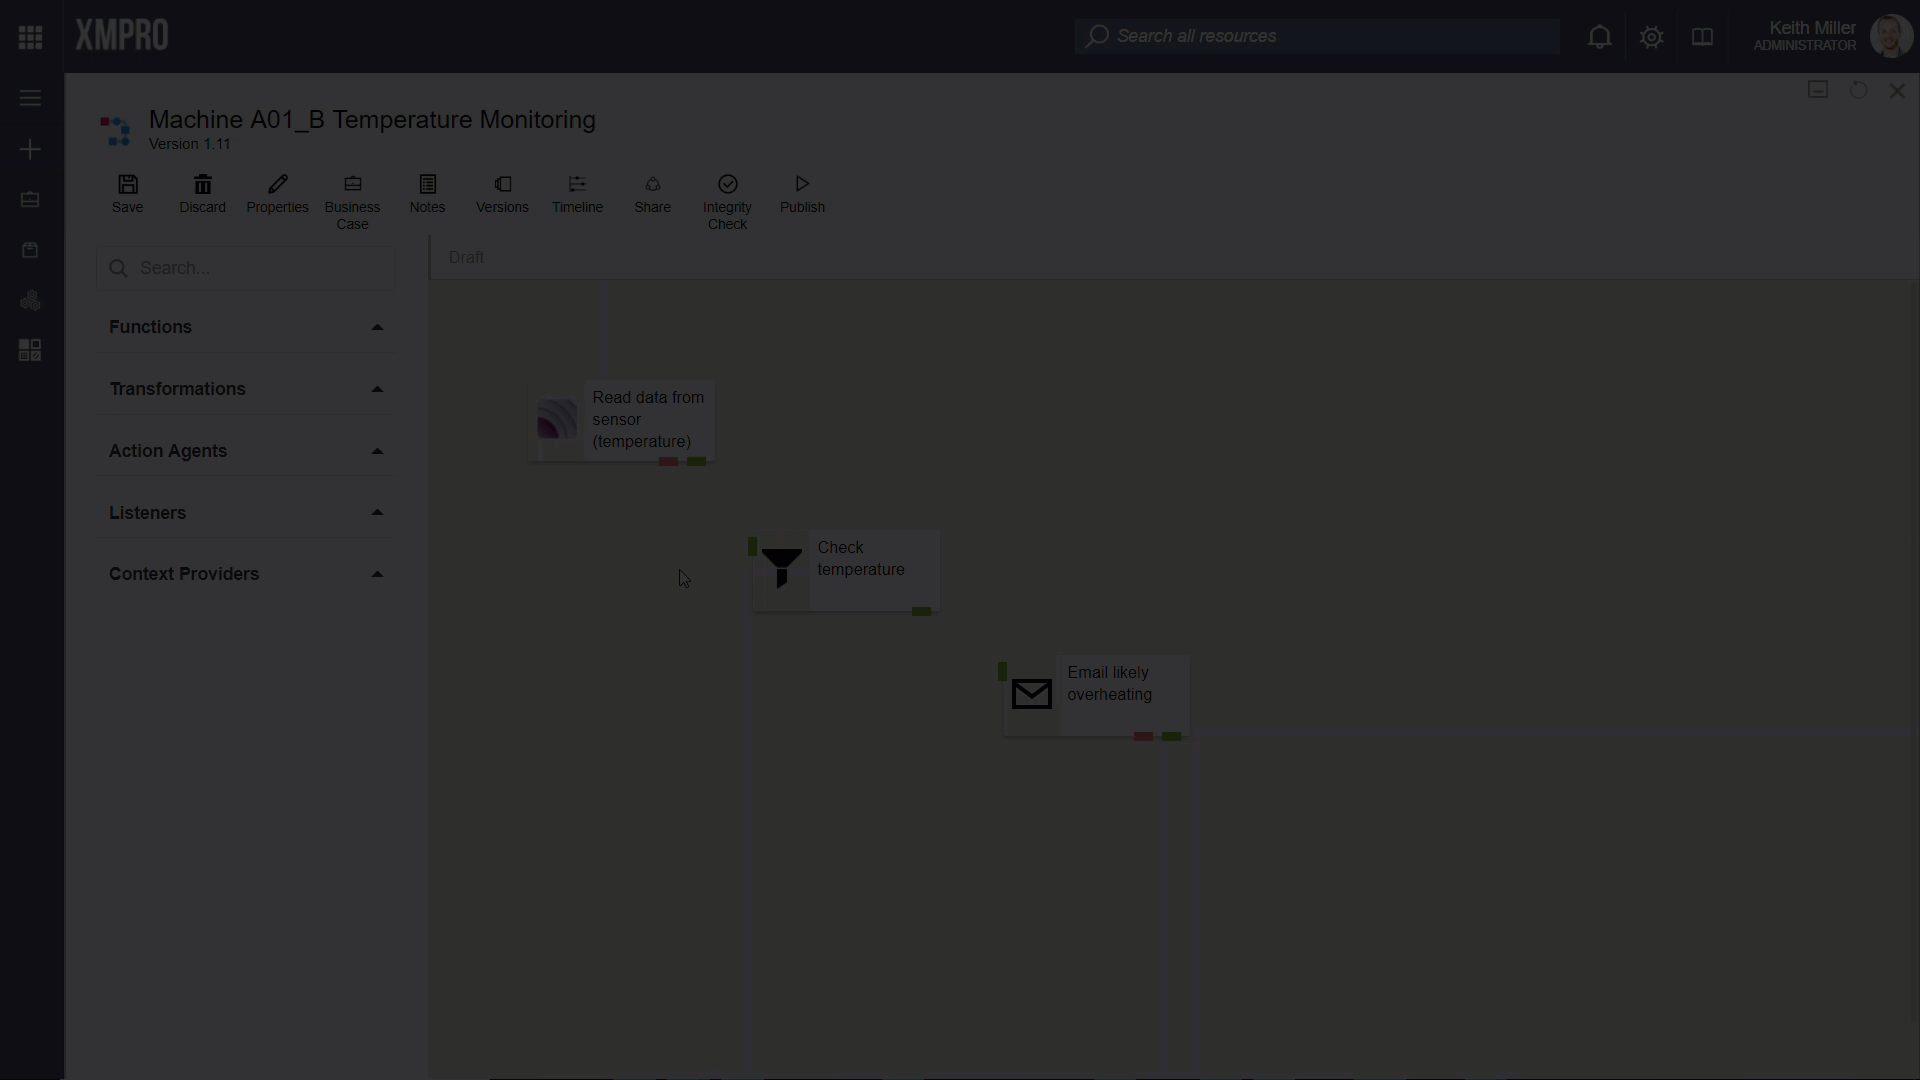
Add agents to the canvas
You are now going to use the three agents referred to in the prerequisites to build your stream:
- MQTT listener (to get the data that gets published to MQTT)
- Filter transformation (to filter the readings that have a value of more than 120oC)
- E-mail action agent (to send the notification to someone that has to make the decision to cool the machine down or shut it down)
For each of these agents, expand the category to which they belong, click on the agent and drag it from the toolbox to the canvas.
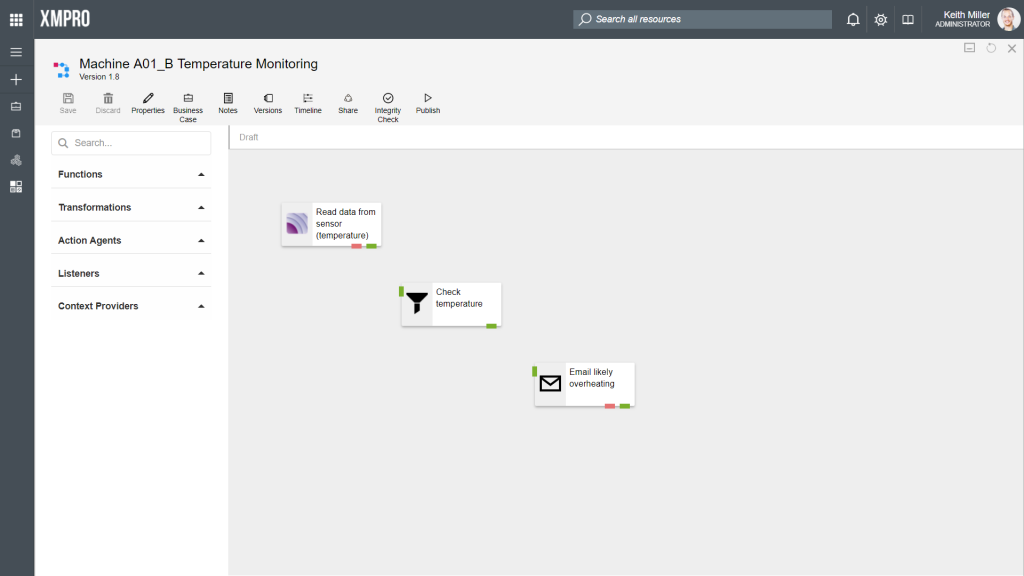
Rename the agents
Now that you have added your agents to the canvas, you can change their names to be more descriptive than the default names assigned to them.
Click inside the MQTT agent block (on the text). You will now be able to edit the text. In the image below, we will be changing the first agent’s name as an example. Change the text for all three agents and save your changes.
Define the data flow
Next, we are going to define the flow of the data stream. Our aim is to define it in such a way that the data would be read from the sensor, then the temperature would be checked and then an e-mail would be sent if the machine is likely overheating.
To define how the data should flow from agent to agent, you need to connect the agents using arrows. To do this, click on the output endpoint of the MQTT agent, hold your mouse cursor in and drag the arrow to the input endpoint of the Filter agent. In the same way, connect the Filter agent to the E-mail agent. Save your changes.
Configuring your agents
After configuring how data should flow from one agent to the next, configure each of the agents individually. To open the configurations (user settings) for an agent, double click on the agent or click on the agent and then click on the “Configure” button. The order in which you have to configure the agents are as follows:
- MQTT listener
- Filter transformation
- E-mail action agent
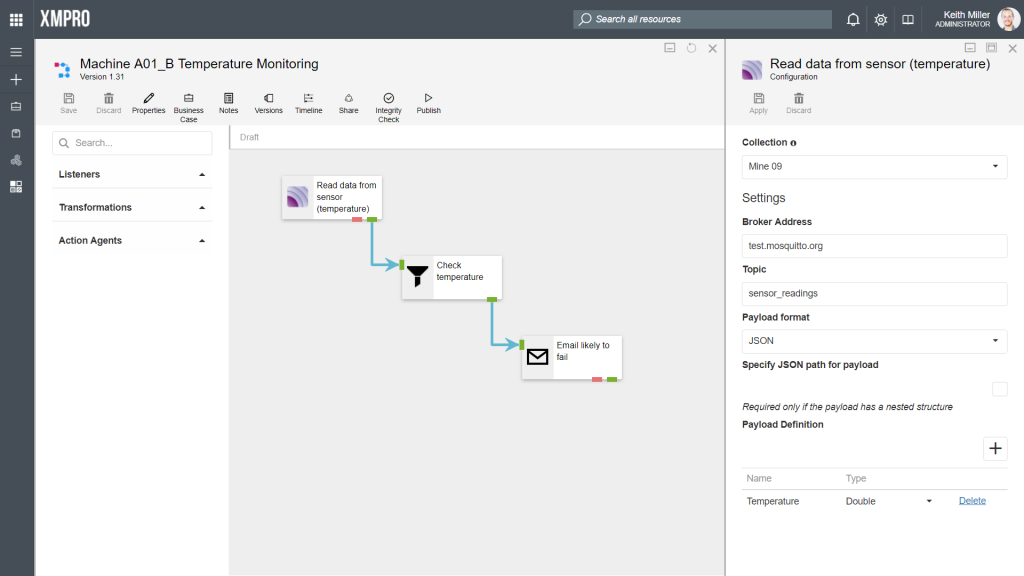
MQTT Listener
For the MQTT agent, we will be simulating readings from a temperature sensor based on the steps outlined in the How to Simulate Data Using an MQTT Listener Agent article. If you have not used MQTT before, it is recommended that you follow the steps in this article to configure the agent.
The configurations we will use are as follows:
- Broker address: “test.mosquitto.org” (this is a public MQTT broker)
- Topic: “sensor_readings” (choose any topic, as long as it is the same topic as the one you publish the data to in MQTT.fx)
- Payload format: JSON (thus, you are specifying that the temperature readings will be published in JSON format)
- Payload definition: Name: “Temperature“; Type: “Double” (you will need to specify a payload definition to be able to check the temperature when configuring the Filter agent)
For more information, please refer to the help documentation.
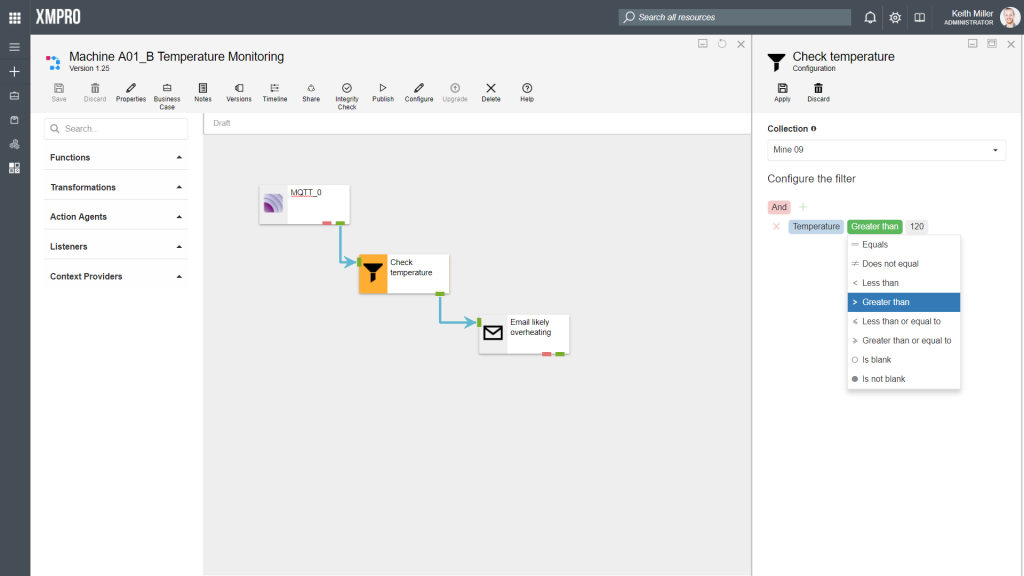
Filter Transformation
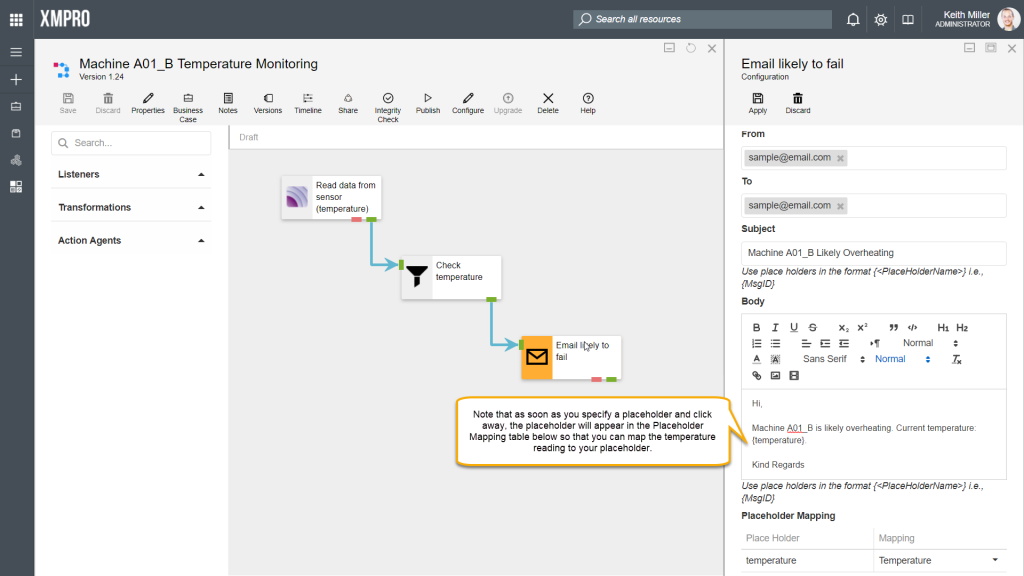
In our data stream, we want the E-mail to be sent if the temperature exceeds 120oC. This will have to be configured in the filter agent. As per the help documentation for this agent, add the following condition:
- “Temperature” greater than “120“
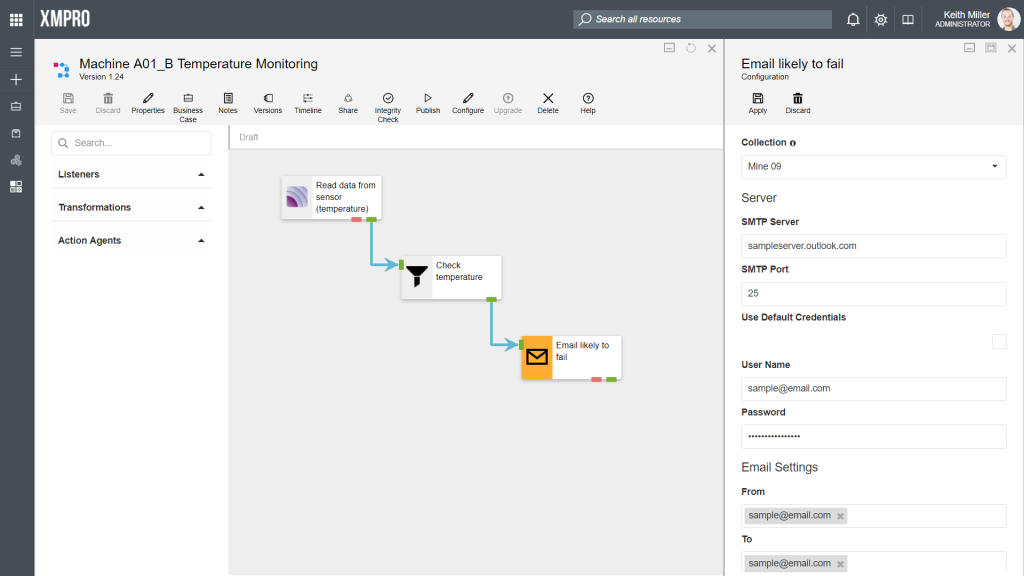
Email Action Agent
The last agent to configure, is the E-mail action agent. Configure this agent, as per the help documentation.
Publishing your data stream
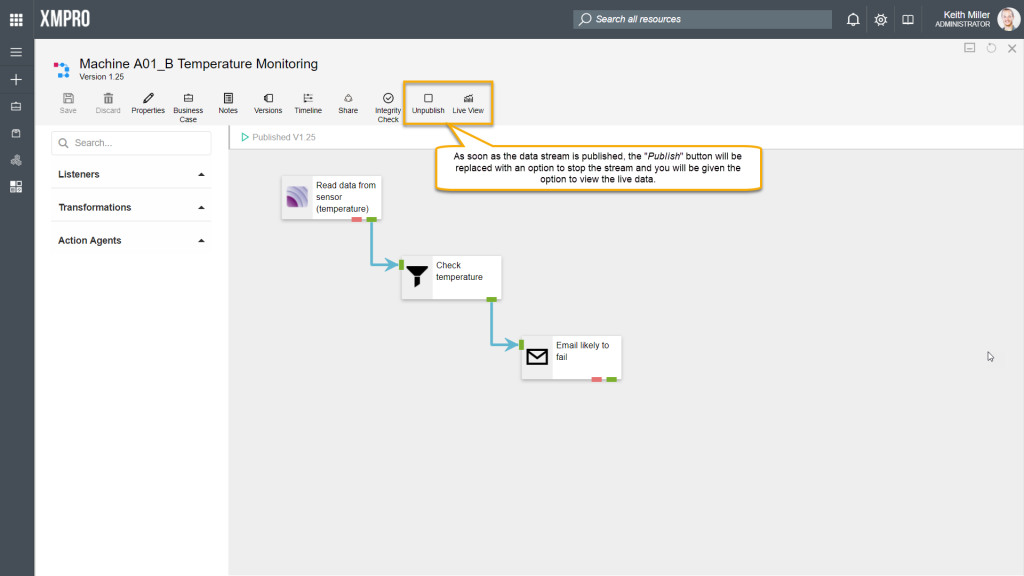
As soon as your data stream is published, it will start performing the functions it has been designed to do. Thus, it will start by getting the values posted to MQTT and sending it to the next agent, processing the data according to the design of the data stream. To publish your data stream, click on the “Publish” button. Note that this button will change its text to “Unpublish” as soon as you have clicked on it and the data stream was successfully published. Clicking on “Unpublish” will stop the data stream from executing any further actions immediately.
Viewing the data
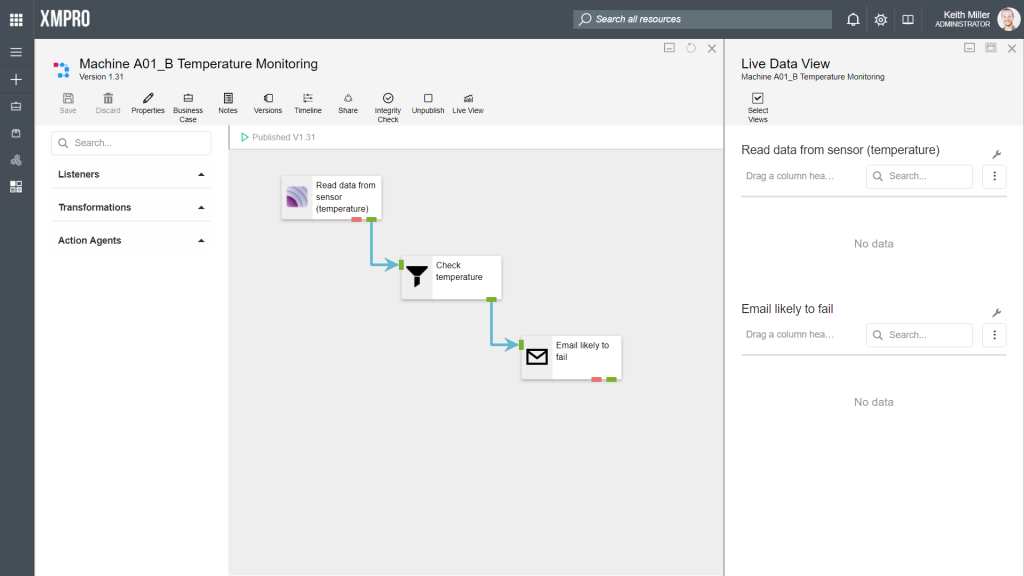
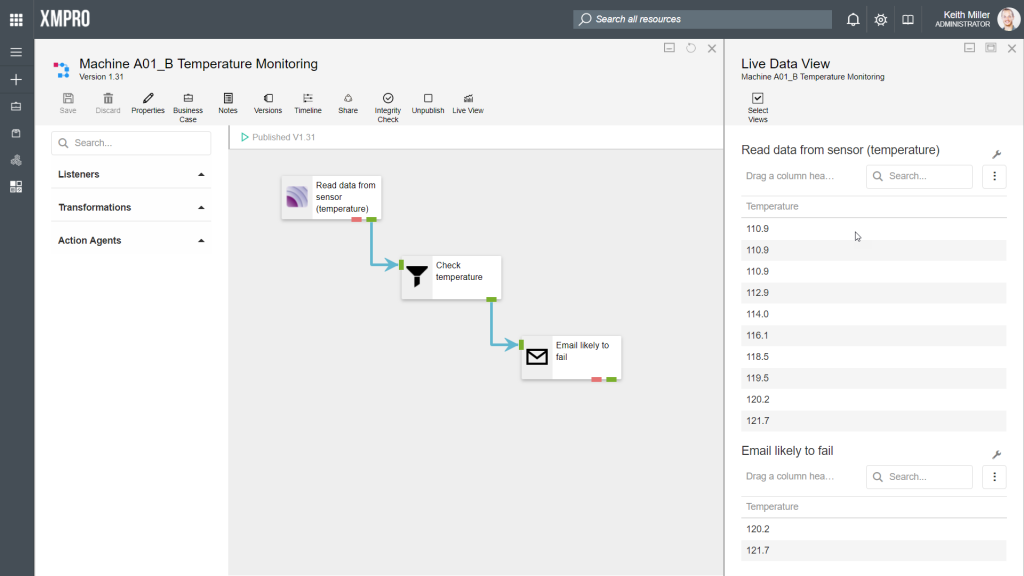
Now that your first data stream is running, lets look at how to view live data. For this example, we will look at the live data of the MQTT listener agent as well as the live data of the E-mail action agent. The data we see for the MQTT listener agent will show us all the temperature readings that the agent receives where as the data we see for the E-mail action agent will only contain the temperature values higher than 120oC.
Follow the steps below:
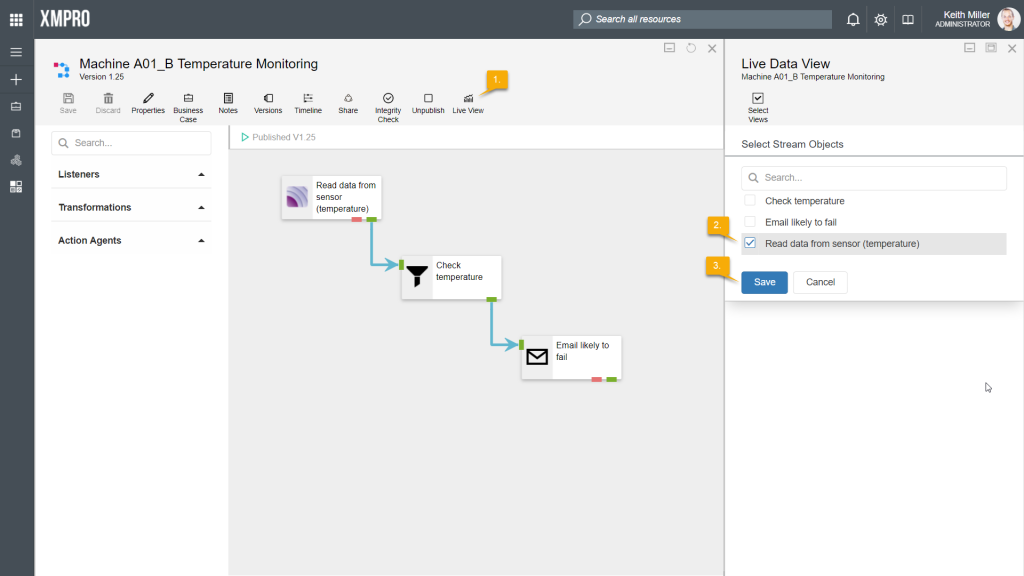
- Click on “Live View“
- Select the MQTT listener agent as well as the E-mail action agent; thus, select the “Read data from sensor (temperature)” and “Email likely to fail” options from the list.
- Click “Save“.
Since we are not using an actual device in this example to read the temperature, use MQTT.fx to simulate the readings and keep an eye on the table in the Live View to see the data. If you are unsure about how to publish values to MQTT, please refer to the How to Simulate Data Using an MQTT Listener Agent article.