Definition
An agent, previously known as a stream object, is a reusable component that functions as a building block for streams. Each agent is designed to perform a specific function in a stream and consists of code, settings, and other properties that are packaged into a file that can be uploaded to Data Stream Designer.
XMPro has a library of agents that are already written and ready for use. To acquire any of these agents, please contact your XMPro sales representative or write to us at [email protected]. Alternatively, since agents can be written by anyone that has some knowledge of programming and has access to the required technologies, you can write your own agent by following these instructions.
Categories
In Data Steam Designer, agents are divided into different categories, depending on the overall function they perform. There are five different categories available: Action Agents, Context Providers, Listeners, Transformations and Functions.
Action Agents
An action agent is an agent that consumes events in a stream and then performs internal or external (third-party) actions, e.g. sending notifications or performing data warehouse updates. Action agents output a response after each event has been processed. For example, the Azure SQL Action Agent writes data to an Azure SQL database.
Context Providers
Context providers are agents that provide context to a stream by consuming reference or static data and making it available. For example, the SQL Server Context Provider provides static data to the data stream by reading the data in a database table and sending it to the next agent.
Listeners
Listeners are agents that listen for data or events from sensors and third-party systems. For example, the MQTT Listener listens for data from sensors as it is posted to MQTT.
Transformations
Transformation agents alter the shape or form of data. For example, the Join Transformation joins data it receives from two separate data sources.
Functions
Functions perform specific mathematical or statistical operations on data. For example, the FFT Function performs forward FFT calculations on data it receives.
Components
Along with the code that is written for an agent, defining what actions the agent should perform in a data stream, user settings are specified for the agent. These settings are values that the user has to provide for the agent to be able to function properly, such as a username, password, or server URL.
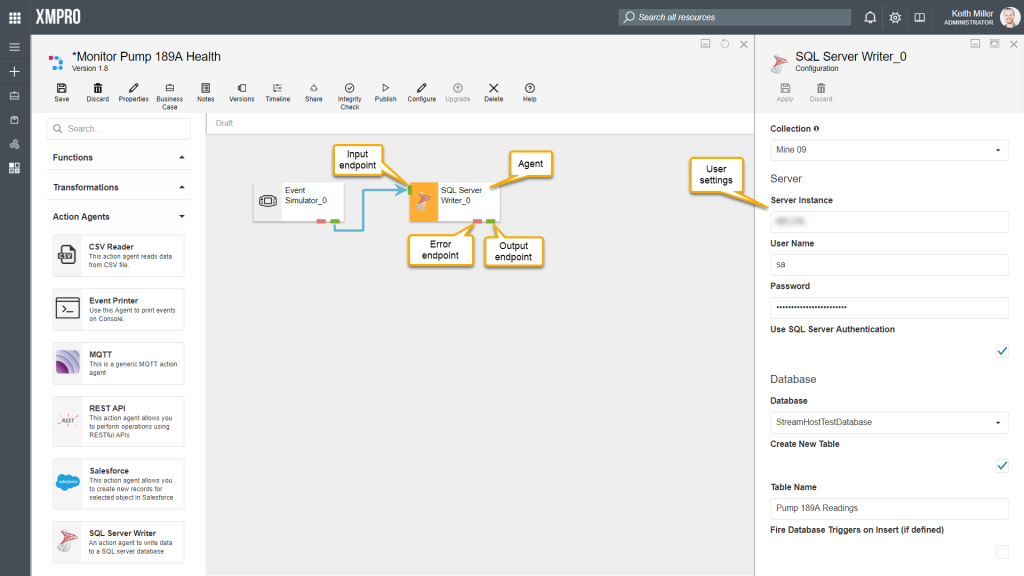
For example, consider the SQL Server Writer agent. The function this agent needs to perform in a data stream is to take the data it receives and write it to a table in a database. The settings a user needs to define for the agent to be able to do that may be as follows:
- Name of the SQL Server instance
- SQL Server username
- Whether SQL Server authentication should be used or not
- SQL Server password
- Database the data should be written to
- Whether a new table should be created or not
- Table in the database that should be used to write the data to, if the user wishes to use an existing table
- Name of the table that should be created if the user wants to write the data to a new table
- If database triggers should be fired if a record is inserted
In addition to the User Settings template, the following properties are also required to be specified at the time of packaging:
| Property | Description |
| Name | Name of the agent. This is usually one or two words that describes the agent. |
| Description | Detailed explanation of the function the agent performs in a data flow. |
| Type | |
| Platform | Platform used to write the agent. Options available include NetCore and Java. |
| Version | Version of the agent. |
| Virtual | Flag indicating if the agent can be classified as being virtual or non-virtual. |
| Help URL | URL linking to online resources that would aid a person intending to use the agent in a stream in understanding the function of the agent as well as how to configure it successfully. |
| Entry point | The namespace and class name of the agent’s DLL file, for example, if an agent with class name “ActionAgent” is located in the XMPro.JupyterNotebookAgents namespace, the entry endpoint for it would be “XMPro.JupyterNotebookAgents.ActionAgent”. |
| Input endpoints | The point, visually represented on the Use Case canvas as a green square, that allows an agent to receive data from another agent. |
| Output endpoints | The point, visually represented on the Use Case canvas as a green square, that allows an agent to send data further along the stream when connected to a subsequent agent. |
| Error endpoint | The point, visually represented on the Use Case canvas as a red square, that allows an agent to send any error data further along a part of the stream, designed to handle data records or events that do not meet certain requirements. |
| Icon | Image that represents your agent. |
| Require input map | Flag indicating if the the agent should receive events in a specific structure. This enables the arrows leading to an agent to be made configurable and will allow the user to map the inputs of an agent to incoming attributes. |
Virtual vs Non-Virtual Agents
In terms of the inner workings of an agent, an agent can either be virtual or non-virtual. When packaging an agent using the Stream Integration Manager, it is important to specify if an agent is virtual by making sure that the Virtual checkbox is correctly ticked.
Virtual Agents
A virtual agent is an agent that is not bound to a certain environment to be able to function, for example, the Azure SQL Listener is an agent which can be configured anywhere as it will always have access to the globally available Azure SQL Server, which it needs to integrate with.
Non-Virtual Agents
An agent can be classified as non-virtual if it relies on a specific environment to function. Non-virtual agents need to interact with a system that is only available in a specific environment, for example the SQL Server Listener. The SQL Server Listener is an agent that can only be configured while it is on the same local area network as the SQL Server instance it needs to connect to.
Creating Agents
Creating an agent can be divided into two parts:
- Writing the code for an agent
- Packaging the agent
Agents are generally written in C# as library projects that make use of the XMPro.IoT.Framework NuGet package. To build a new agent, make sure that you are using a version of Visual Studio that supports .Net Core 2.1 as the XMPro.IoT.Framework package relies on it. You will also have to make sure that your project targets the .Net Standard framework.
XMPro.IoT.Framework requires your project to be written using a predefined structure. This structure requires you to implement certain interfaces, depending on the type of agent you are creating. To learn more about how to use this framework, refer to these instructions.
After writing your code, you need to use the Stream Integration Manager Windows 10 desktop application to package your agent. This application allows you to specify all the properties your agent requires, add the user settings in the form of controls, and allows you to upload the DLL of the agent you’ve written. Finally, it will create a file with an “.xmp” extension, which you can upload to Data Stream Designer and start to use to build streams. To package the agent, refer to these instructions.
Usage: Uploading an Agent to Data Stream Designer
After writing a new agent and packaging it, you can upload it to Data Stream Designer by following the steps below:
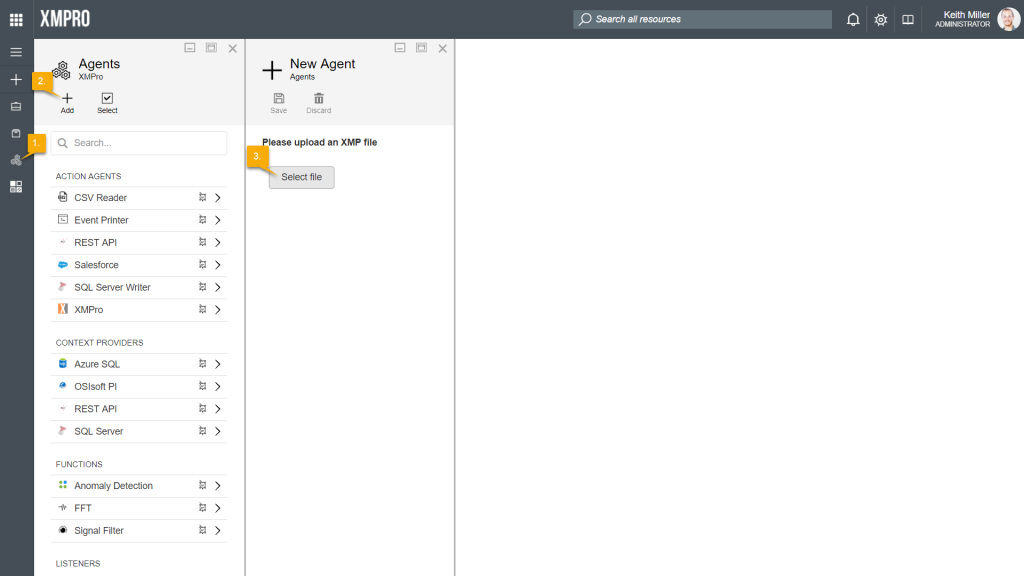
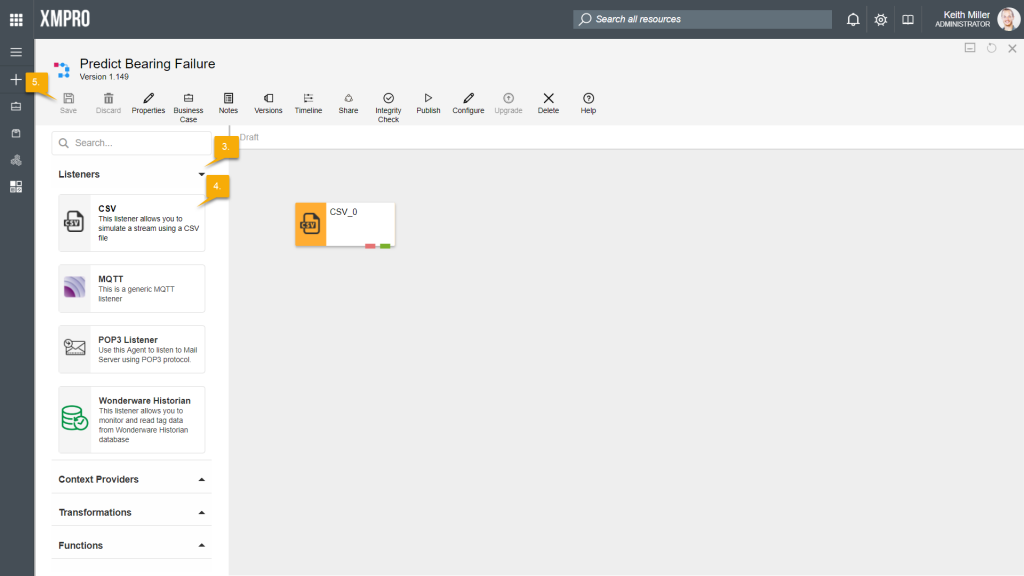
- Open the Agents page from the left-hand menu.
- Click on Add.
- Click on the Select File button and browse to the .xmp file you’ve packaged.
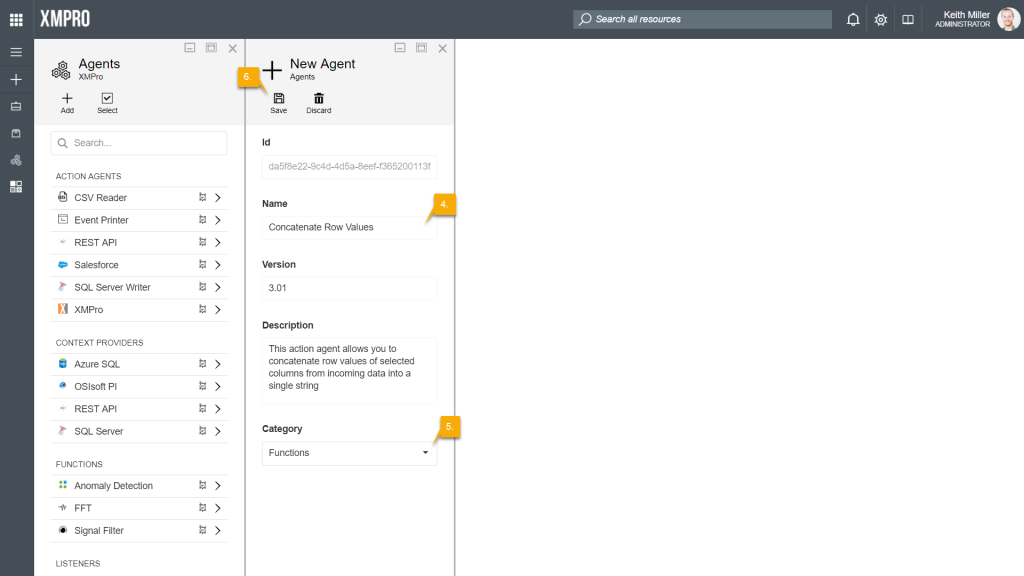
- If the .xmp file is valid, some of the details contained in the file, such as the name of the agent, will automatically be listed on the form.
- Select the correct category in which the agent can be classified.
- Click Save.
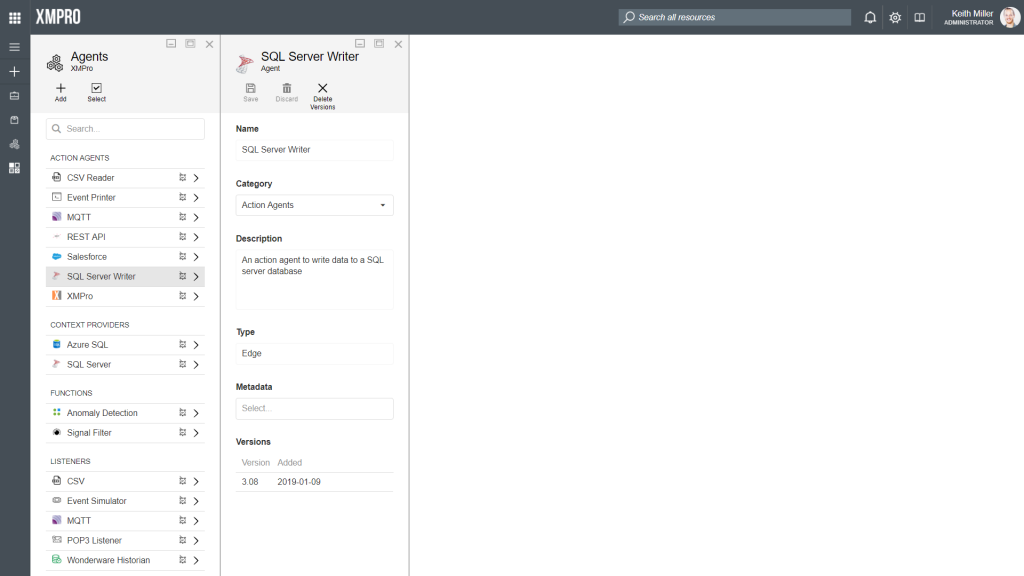
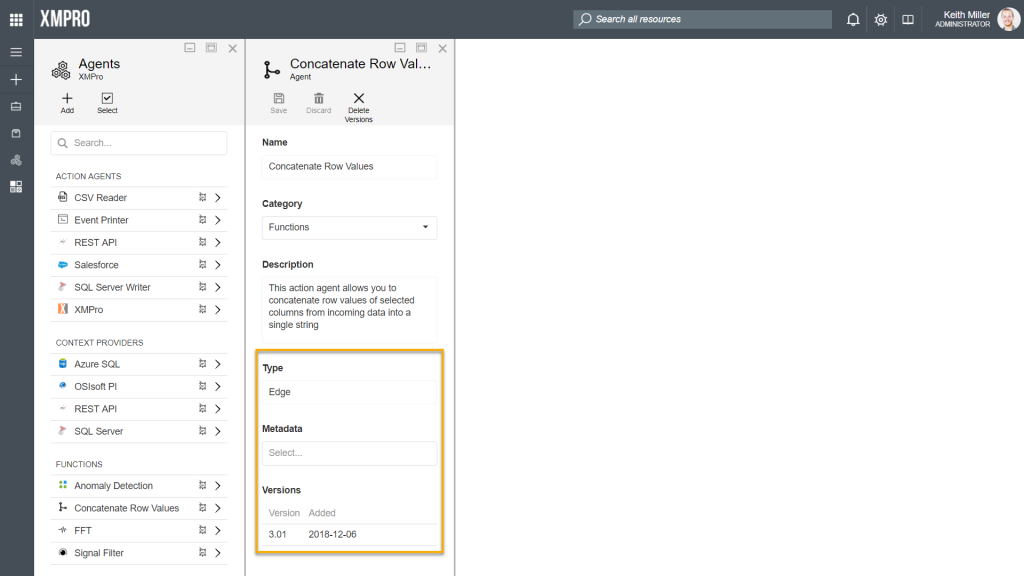
- Additional information that forms part of the agent’s details will be displayed on the form, such as the version and Metadata.
The newly uploaded agent will now be available in the toolbox on the Use Case canvas page. To add an agent to the canvas, follow the steps below:
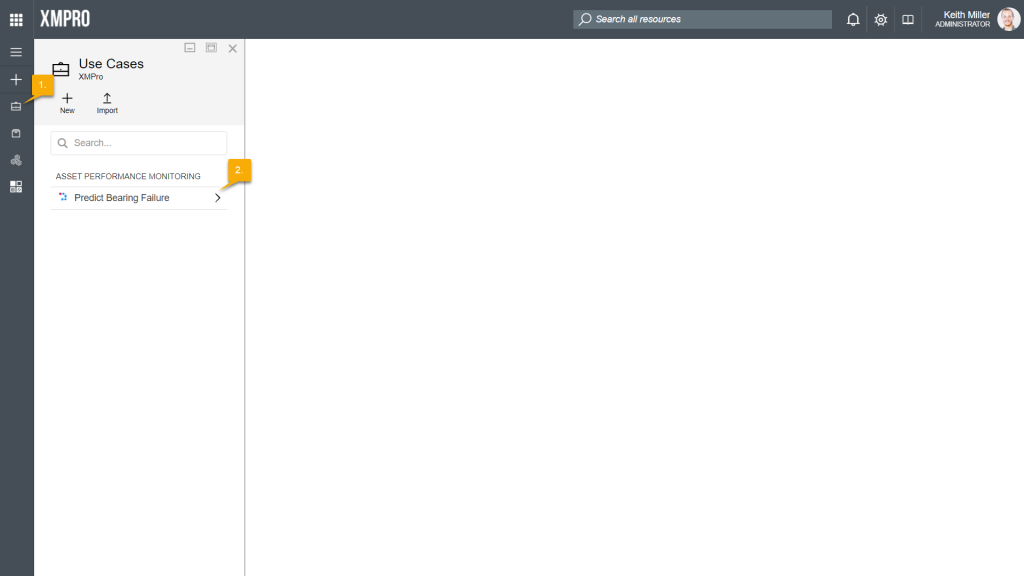
- Open the use cases page from the left-hand menu.
- Select your use case.
- Expand the category in the toolbox where your agent is located.
- Click on your agent and drag the agent to the canvas.
- Click Save.
Usage: Upgrading
To upload a new version of an agent, you should follow the same steps as when uploading an agent for the first time (see above section). The new version of the agent will appear in the Versions section of your agent’s detail page.
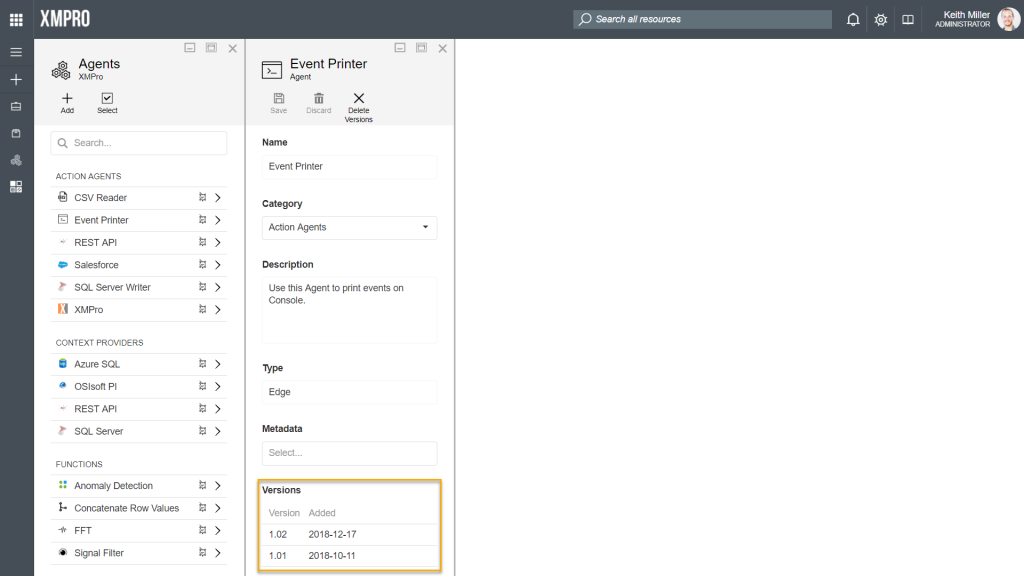
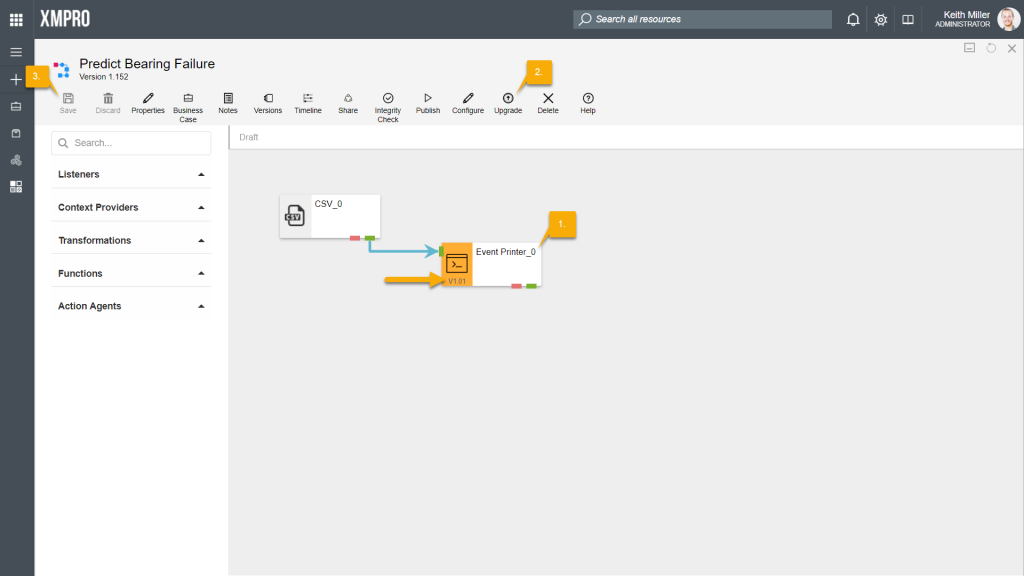
The agents in the toolbox will always be the latest version available; however, the versions of the agents in your existing streams will have to be upgraded as this is not done automatically. On the canvas, any agent that is not the latest version will display its version underneath its icon.
To upgrade the version of an agent in a stream, open your use case and select the agent. Click on “Upgrade” and then “Save“.
Usage: Deletion
Single Deletion
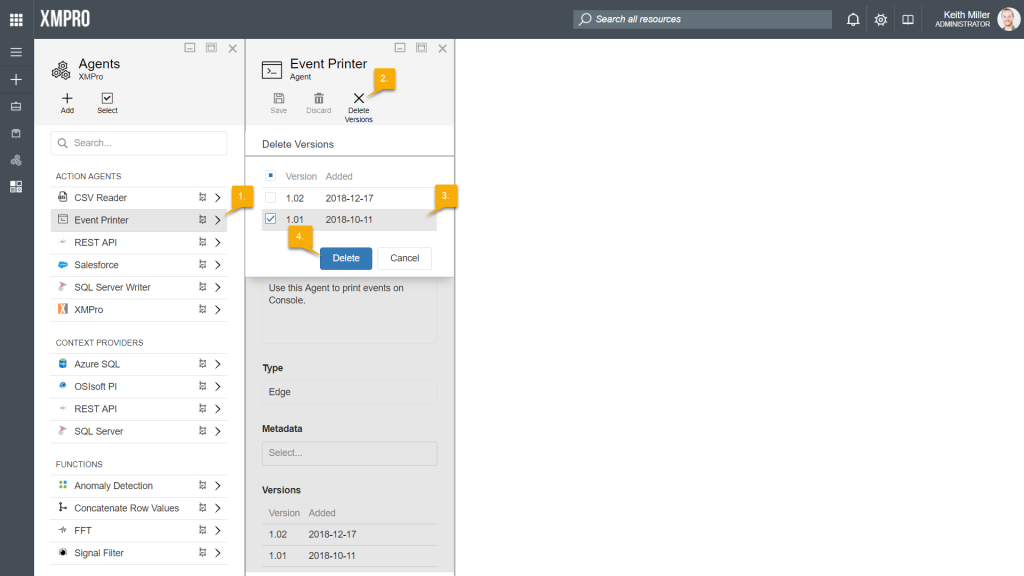
To remove one or more versions of a specific agent, first make sure that the versions of the agent that you’re planning to remove are not being used anymore. Then, open the Agents page from the left-hand menu and follow the steps below:
- On the Agents page, select the agent.
- Click on “Delete Versions“.
- Select the versions you would like to delete.
- Click Delete.
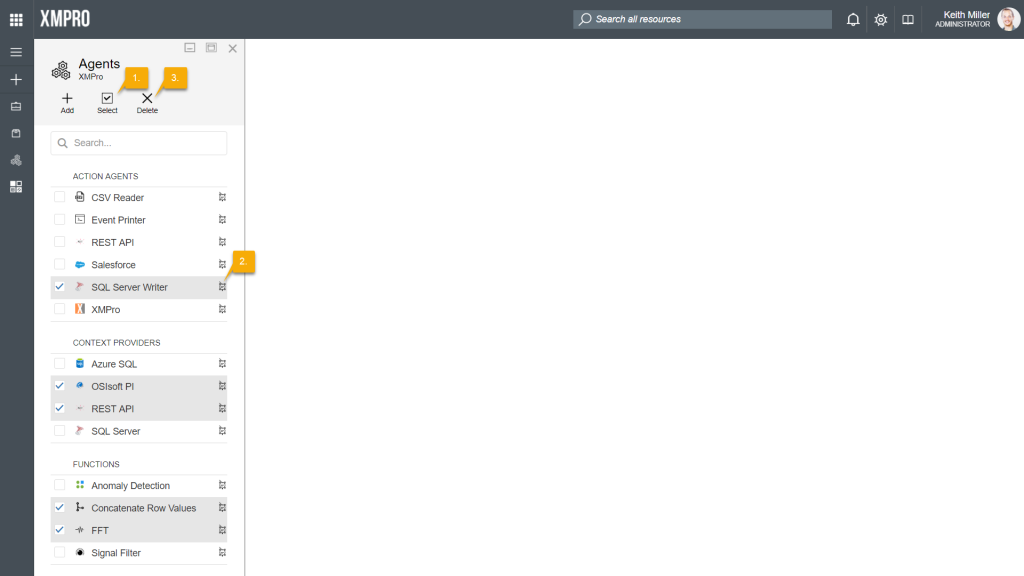
Multiple Agents
When planning to remove multiple agents completely at the same time, make sure they are not being used anymore, open the Agents page from the left-hand menu and follow the steps below:
- Click on “Select“.
- Select all the agents you would like to remove.
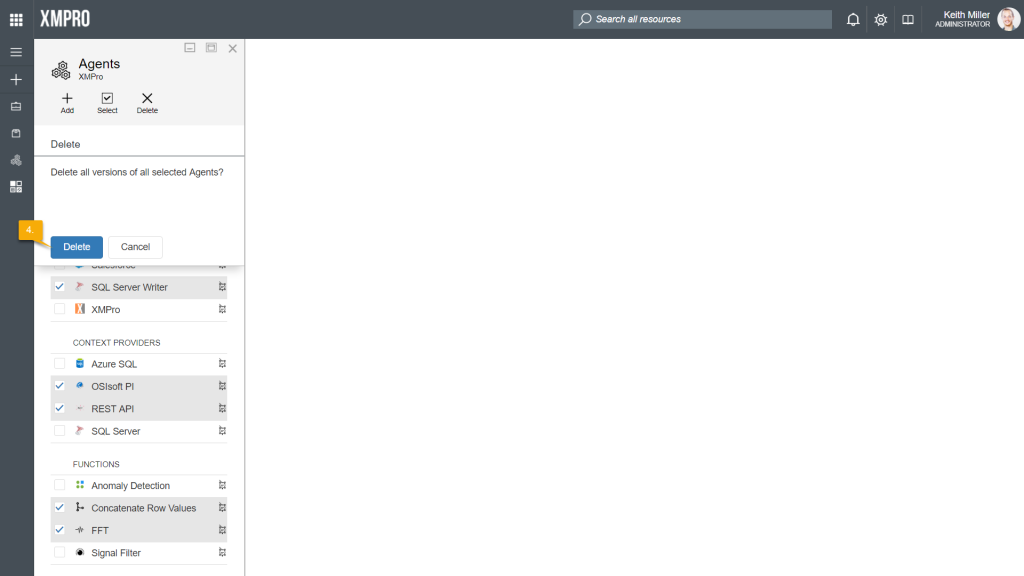
- Click on “Delete“.
- Confirm that you would like to delete all versions of the selected agents.