Overview: Data Streams and Canvas
In Data Stream Designer, a data stream can be defined as a visual representation of flow of data, which is depicted by the use of agents that are connected by arrows, allowing data to flow from one agent to the next and be processed upon reaching each agent, according to the function of that particular agent.
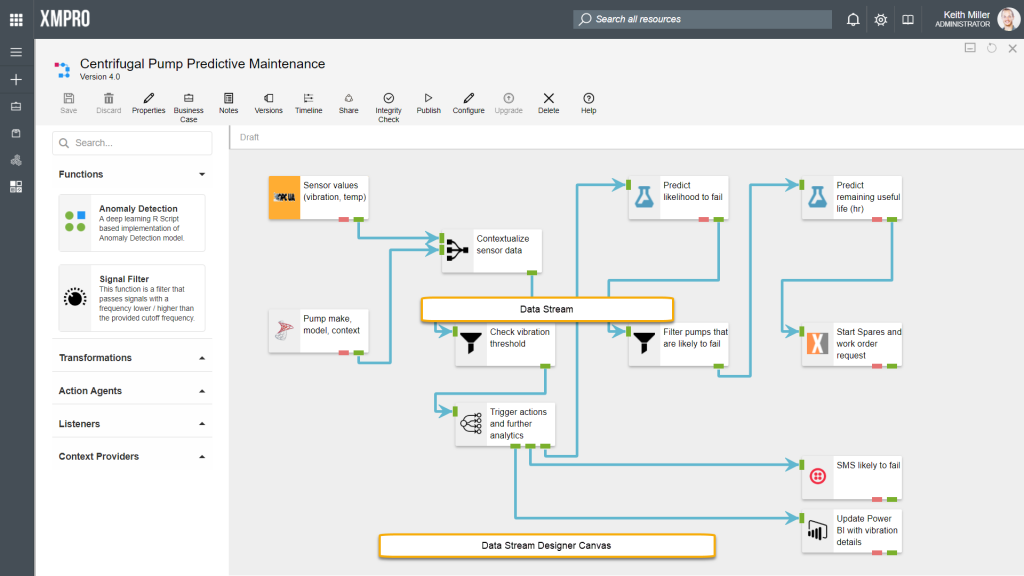
Data streams are built in an interactive canvas-environment that allows you to drag agents from the toolbox to a drawing-area. Each agent’s user settings can then be configured in the same environment as where the stream was built. The canvas also allows for you to perform various tasks related to each data stream, including managing versions, defining business cases, etc.

Canvas: The Toolbox
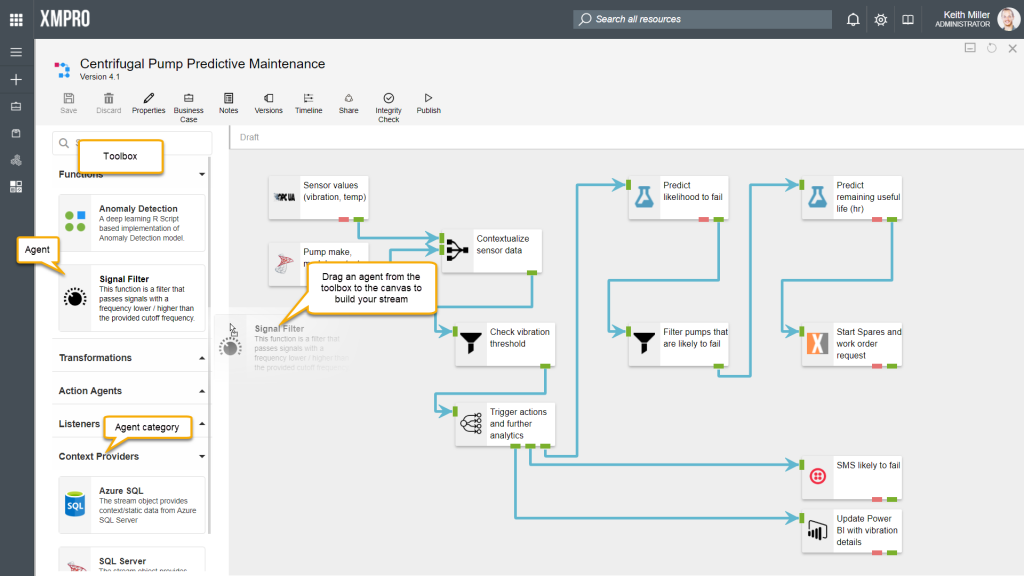
The toolbox is a component in Data Stream Designer that allows you to choose an agent from a library of agents that have been uploaded to the system and drag the agent from the toolbox to the canvas when building a stream. All agents in the toolbox will always be the latest version and will all be available for all users, regardless of their role, unless a user does not have permission to view any of the agents.
Agents are grouped by category in the toolbox. To expand a category, click on the arrow next to the category name. Please note that if no agents in a particular category are uploaded, the entire category will be hidden. Thus, if you are missing some of the categories in the toolbox, it is likely that there aren’t any agents uploaded belonging to that category.
Building a stream
For detailed instructions and an example of how to build your first stream, please refer to this article.
Data Stream and Agent Configuration
User Settings
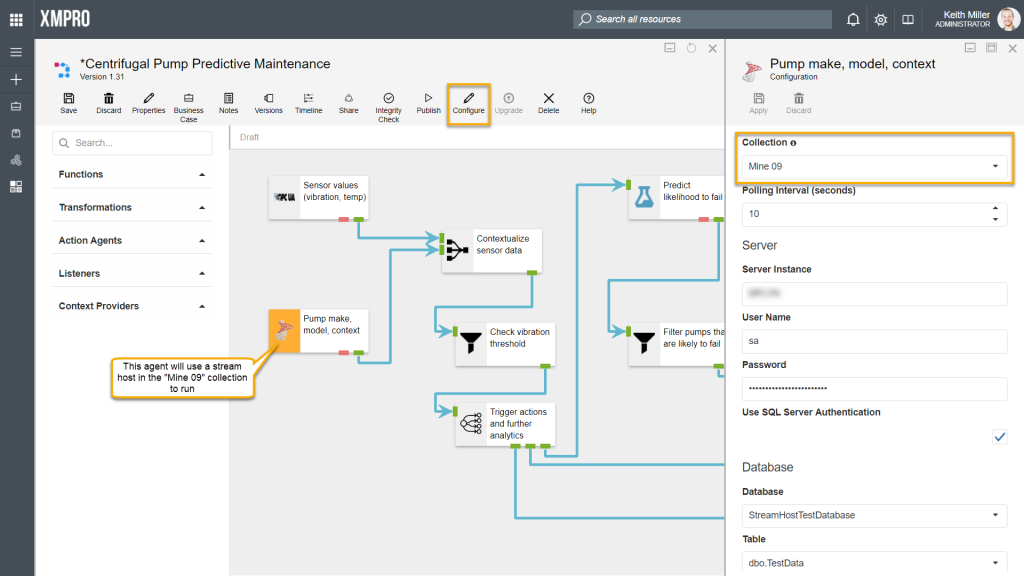
All agents will individually be associated with a collection. This collection may or may not be different than the default collection set for your data stream. This setting will always be listed among the rest of the user settings.
There are a number of agents that do not require any settings, for example, the Event Printer agent. This agent simply prints events and you do not need to specify settings such as a server URL, username, password, or upload a file.
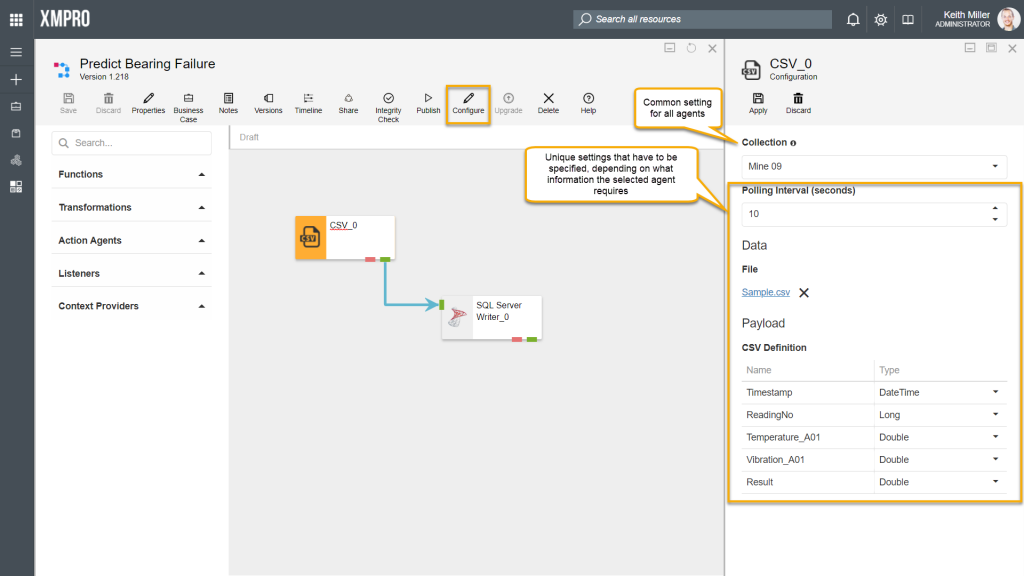
Other agents; however, require settings to be filled in before you can successfully run the stream, for example, consider having a CSV listener agent in your data stream. The CSV listener agent will require you to specify the following values:
- Specify a polling interval (seconds)
- Upload a CSV file
- Specify the CSV definition (name of each column in the CSV file along with what data type the values in each column are)
If these values have been provided correctly, the data will be read from the CSV file you specified when you publish your stream.
Input Mapping and Arrow Configuration
Some agents allow inputs to be mapped, if the Require Input Map property has been set to true during packaging. What input mapping allows you to do is to specify that a specific agent receive its input in a specific structure. This causes the arrows leading to an agent to be made configurable and will allow the user to map the inputs of an agent to incoming attributes, for example:
Consider having the following agents in a stream:
- CSV Listener
- SQL Server Writer
The CSV listener is configured to get data from a file that contains the following headings:
- Timestamp (of type DateTime)
- ReadingNo (of type Long)
- Temperature_A01 (of type Double)
- Vibration_A01 (of type Double)
- Result (of type Double)

The task the SQL Server Writer needs to perform is to write the data it receives to a SQL Server database, but it expects the structure of the data to be in a specific format. The table we need to write the data to has the following columns:
- ID (bigint, identity column)
- ReadingNo (bigint)
- Temperature (float)
- Vibration (float)
- A01B (float)
- Timestamp (datetime)
For the data to be written to the database in a specific format, you need to map the correct columns in the CSV file to the correct SQL Server table columns. To do this, both the CSV listener and the SQL Server Writer agents need to be configured first. To configure an agent, click on the agent and then on the “Configure” button. Fill in all the details required, for example, the SQL Server instance name and credentials.
Next, you can go ahead and configure the input mapping by clicking on the arrow that connects the CSV listener and the SQL Server Writer agents and then click on “Configure“. Choose which column should be mapped to which column by selecting the correct value from the drop-down menu for each row. Please note that the data types of the items being mapped to each other needs to be the same. If not, the value in the left column will be disabled and you will not be able to select it.
Mapping Functions
In some cases, you might have to map a large amount of inputs for an agent. Some functions have been implemented to make the process of mapping a large amount of fields easier, such as Match by Expression, AutoMap, and Show Unmapped.
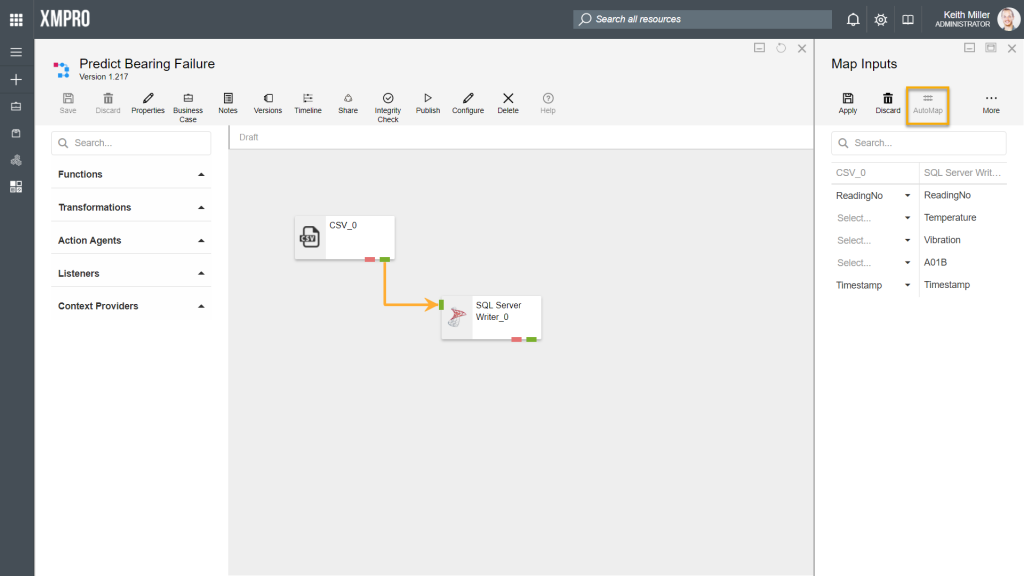
AutoMap
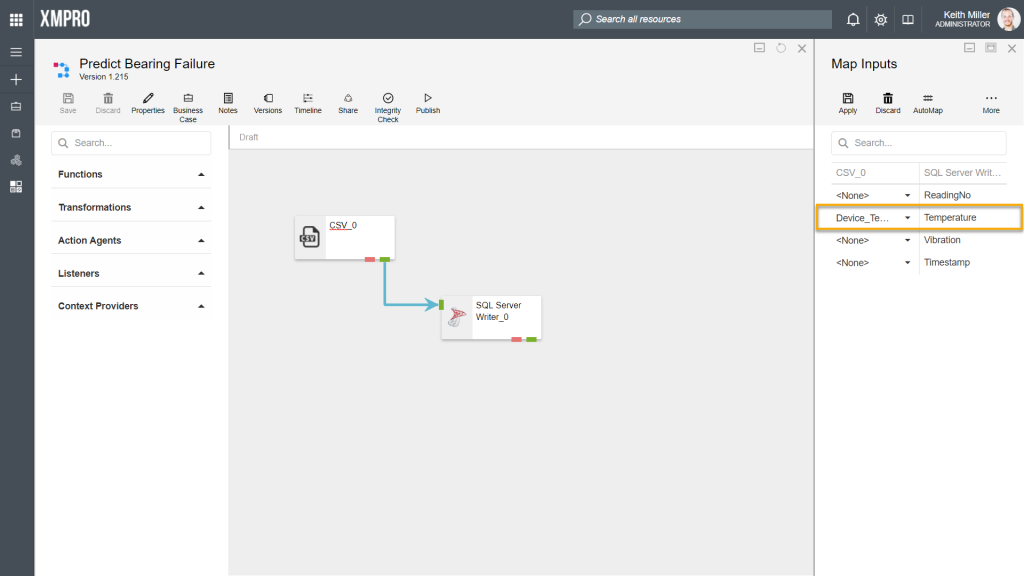
By clicking on the “AutoMap” button, Data Stream Designer will match all the fields that are common between the agents involved, for example, if you look at the stream in the image below, you will notice that both the SQL Server Writer agent and the CSV listener has the fields listed below in common, which will automatically be mapped if they have the same data type.
- ReadingNo
- Timestamp
Match by Expression
The Match by Expression function allows for an expression to be used to make mapping a large amount of fields easier and quicker. The fields can be mapped by using any of the following options:
- Prefix
- Postfix
- Expression
The Prefix option allows you to specify that columns should be matched based on the first part of a column name, for example, consider having the following columns:
- In the CSV listener agent, there is a column named “A01_Temperature“
- In the SQL Server Writer agent, there is a column named “Temperature“
In the images below, “A01_” is specified as the prefix. Based on the prefix given, the column “A01_Temperature” in the CSV listener can be matched to the column “Temperature” in the SQL Server Writer agent.


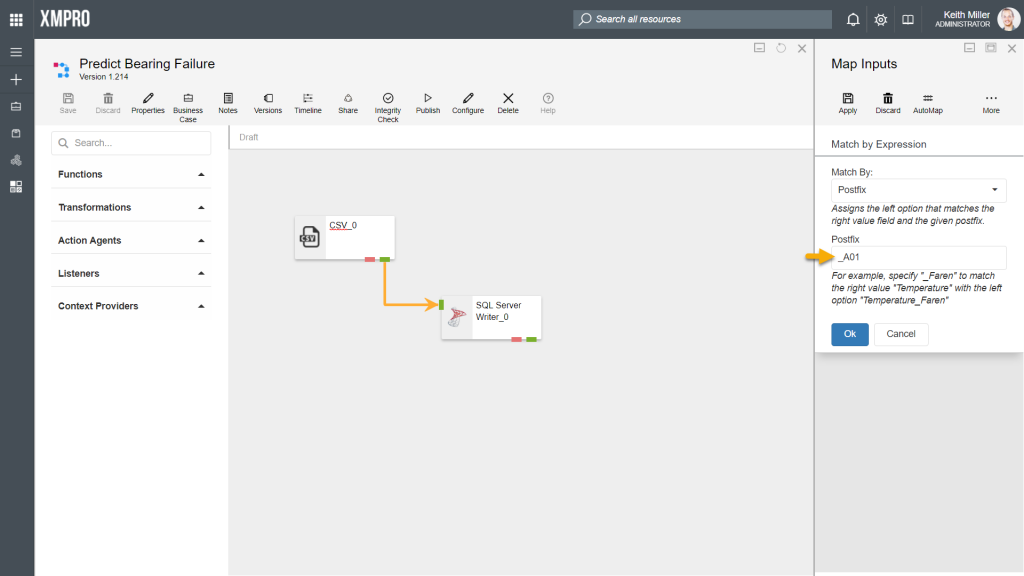
The Postfix option allows you to specify that columns should be matched based on the last part of a column name, for example,
- In the file uploaded to the CSV listener agent, there is a column named “Temperature_A01“
- In the table referenced to in the SQL Server Writer agent configurations, there is a column named “Temperature“
In the images below, “_A01” is specified as the postfix. Based on the postfix given, the column “Temperature_A01” in the CSV listener can be matched to the column “Temperature” in the SQL Server Writer agent.
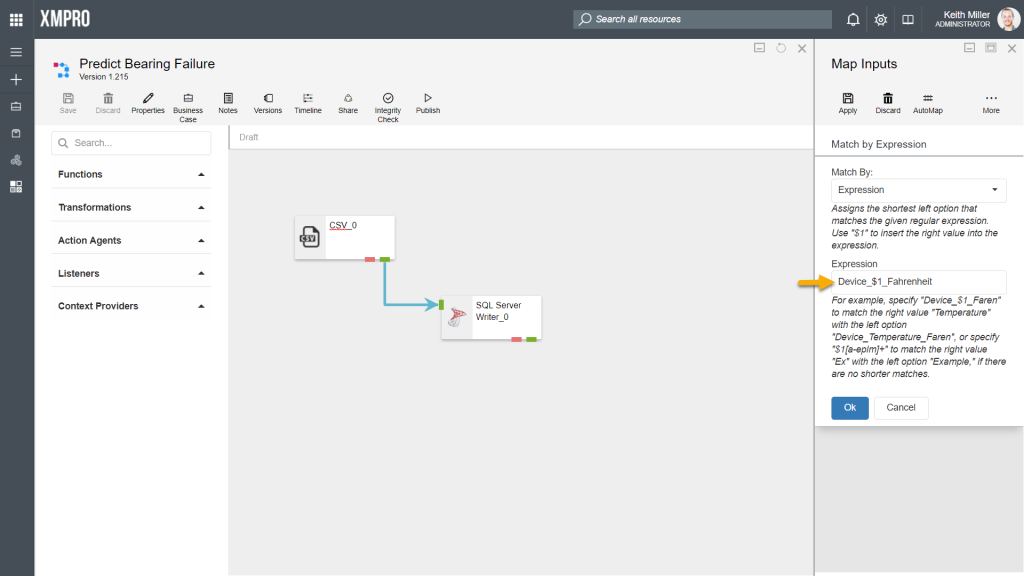
The Expression option allows you to use a regular expression to match the columns, for example,
- In the file uploaded to the CSV listener agent, there is a column named “Device_Temperature_Fahrenheit“
- In the table referenced to in the SQL Server Writer agent configurations, there is a column named “Temperature“
In the images below, “Device_$1_Fahrenheit” is used as the regular expression. Based on this expression, the column “Device_Temperature_Fahrenheit” in the CSV listener is mapped to the column “Temperature” in the SQL Server Writer agent.
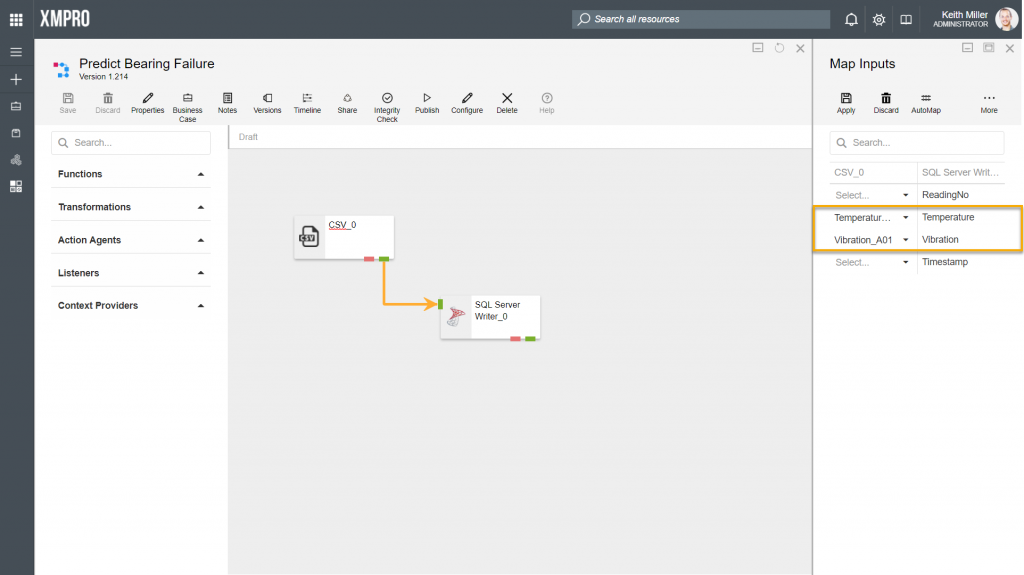
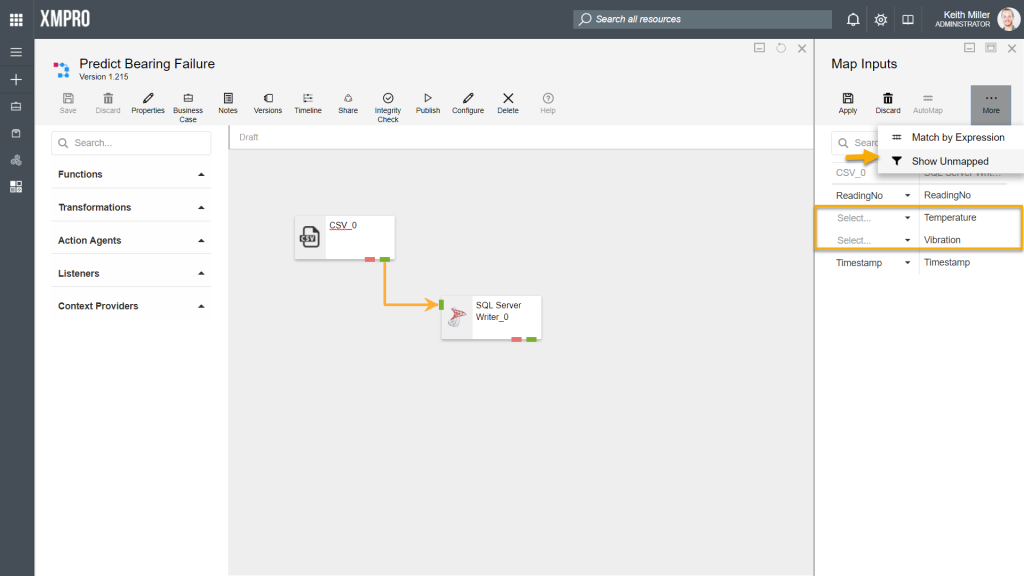
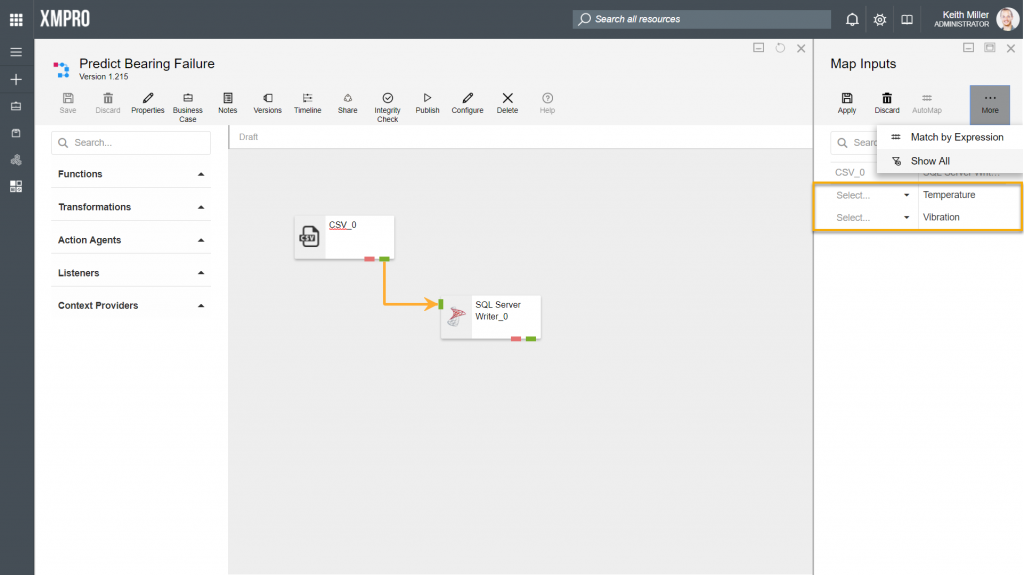
Show Unmapped
The Show Unmapped function allows you to filter the rows displayed, based on if the columns have been mapped. If you chose to filter items based on if they are mapped or not, all the records that haven’t been mapped yet, will be listed, for example,
- In the image below, “ReadingNo” and “Timestamp” has been mapped for both agents using the AutoMap function. However, there are two records that remain that needs to be mapped. In some scenarios, there might be a lot more records with some being mapped and others not.
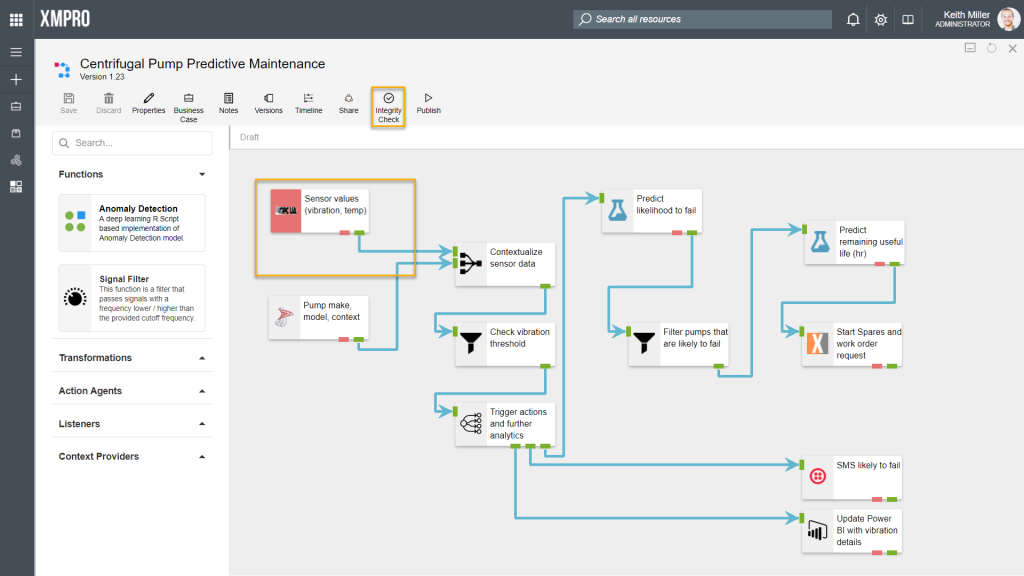
Verifying Stream Integrity
Data Stream Designer offers the capability to verify if the agents in your stream are configured correctly. To verify the integrity of your stream, you can simply click on the “Integrity Check” button. When clicking this button, each agent will call the Validate method in its code. This method contains a set of rules that needs to be satisfied, for example, the SQL Server agent needs to have the following values specified:
- SQL Server instance name
- Username
- Password (if SQL authentication is used)
- Database name
- Table name
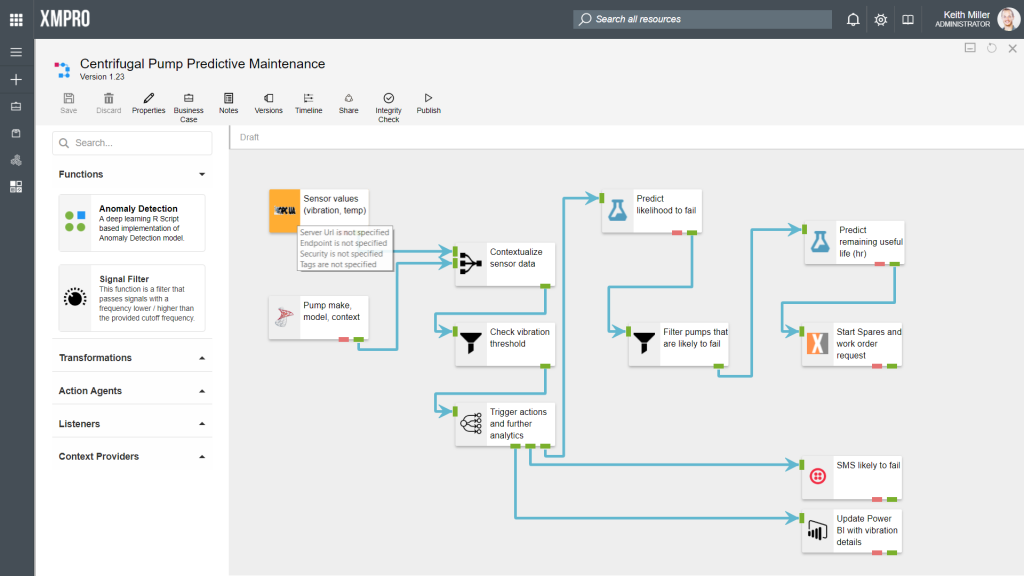
If any of these values are incorrect or not specified, the agent will be marked with red and its code will return a list of errors that it found, which you will see in the form of a list when you hover over the agent with your mouse cursor. To read more about how the code works, click here.
Running Data Streams
Data streams need to be run in order to start performing the functions they have been designed to do. When you click on the “Publish” button, your stream will start running. As soon as this button is clicked, the engine will look at which collection each agent in the data stream is associated with. It will then look at which stream hosts are available for use in each collection and use those stream hosts to allow agents in that collection to execute actions. To read more about how stream hosts and collections work, click here.

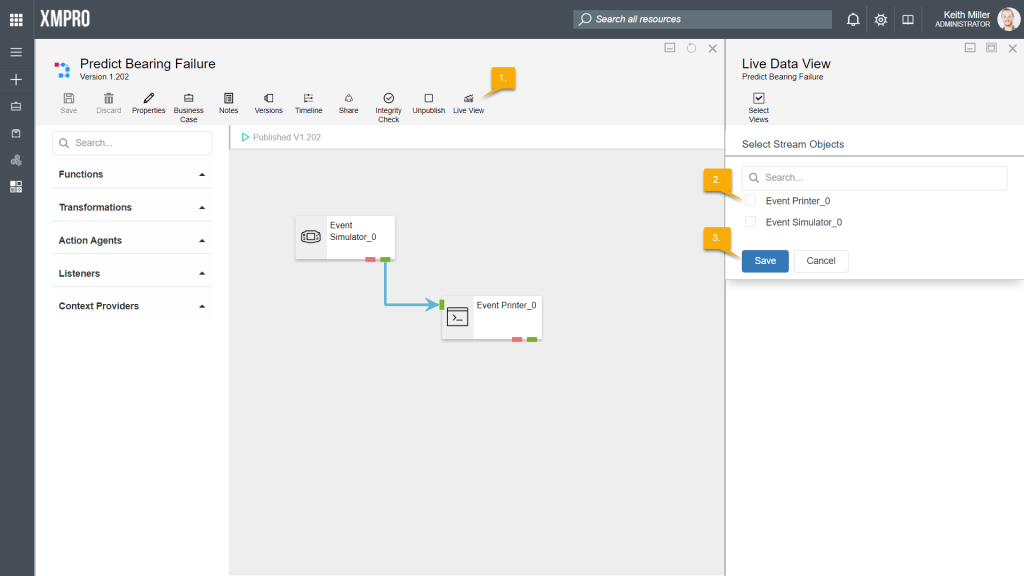
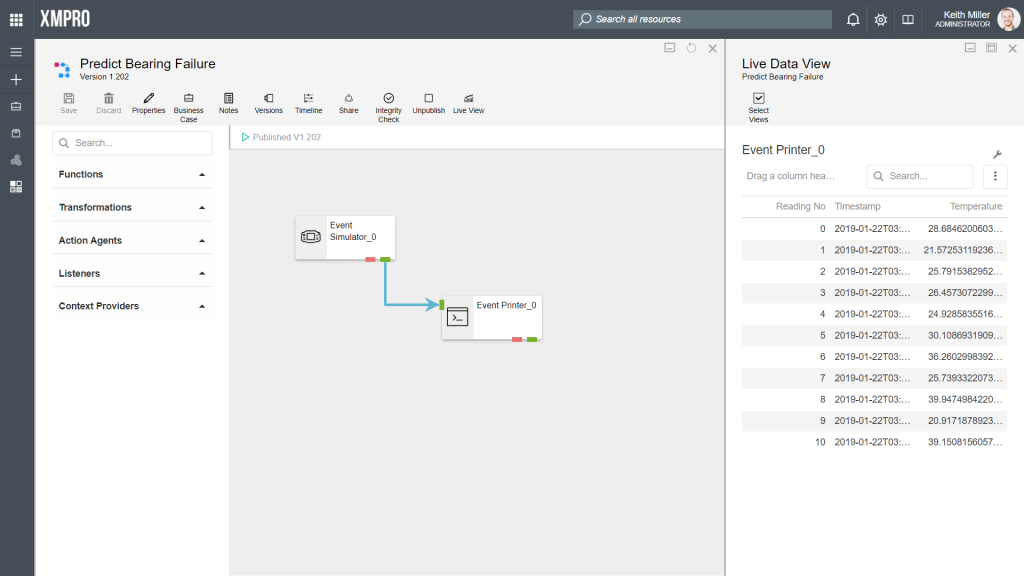
Viewing Live Data
The Live View functionality in Data Stream Designer allows you to view data as it is processed by the agents in your stream.For each agent in your stream, you can let the data display in either a grid, gauge or as a chart. To view this data, select the “Live View” button after publishing your stream. Next, select the agents you would like to view the data for.
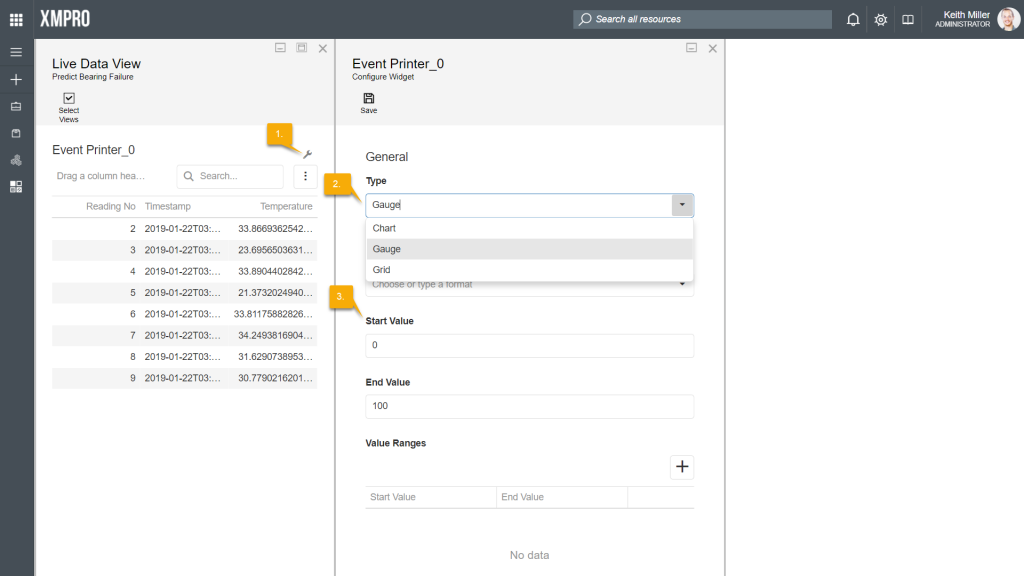
To change the type of control the live data is displayed in, follow the steps below:
- Select the settings-icon from the Live View page.
- Choose the type of control you would like to use.
- Configure the values of the control.
- Click Save.
Version Management
Data stream version increases are automatically handled by the system every time you make changes to your stream and save those changes. However, control over how major version increases are handled are given, to some extent, to the user as versions of any data stream can easily be copied or removed.
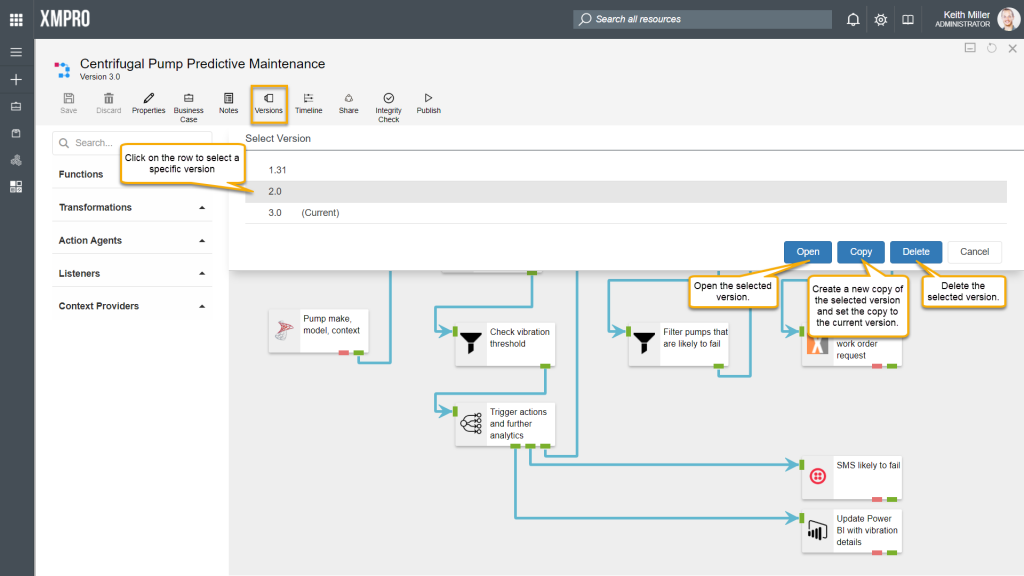
Copying a version of a stream allows you to continue working and making changes to the stream, while maintaining a version of the stream before you made changes, which can also act as a back-up mechanism. To view the available versions of a stream, click on the “Versions” button.
Opening a specific version
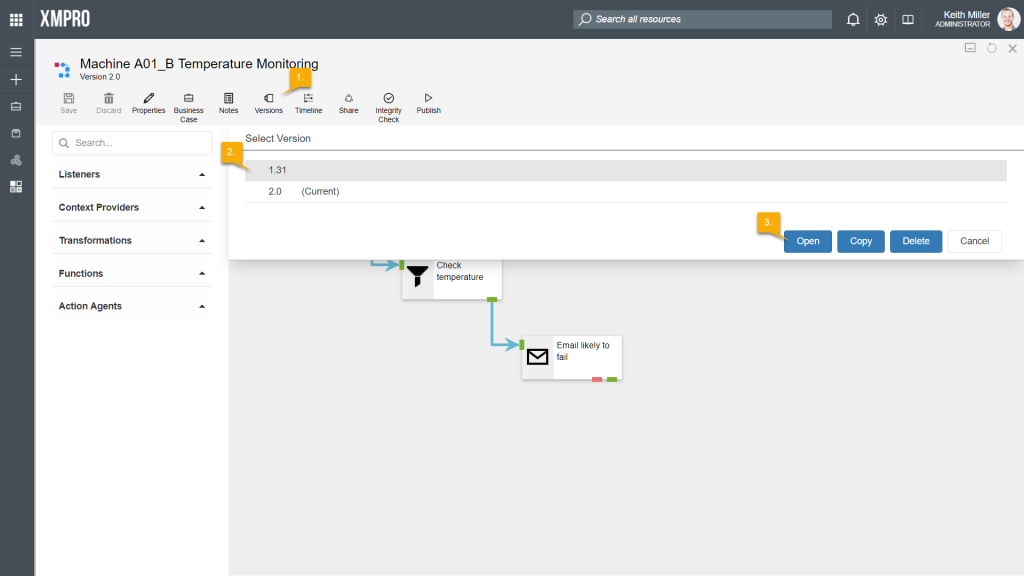
Any of the major versions of a data stream can be viewed at any point in time. To open a specific version, follow the steps below:
- Click on “Versions“.
- Select the version you would like to view.
- Click “Open“.
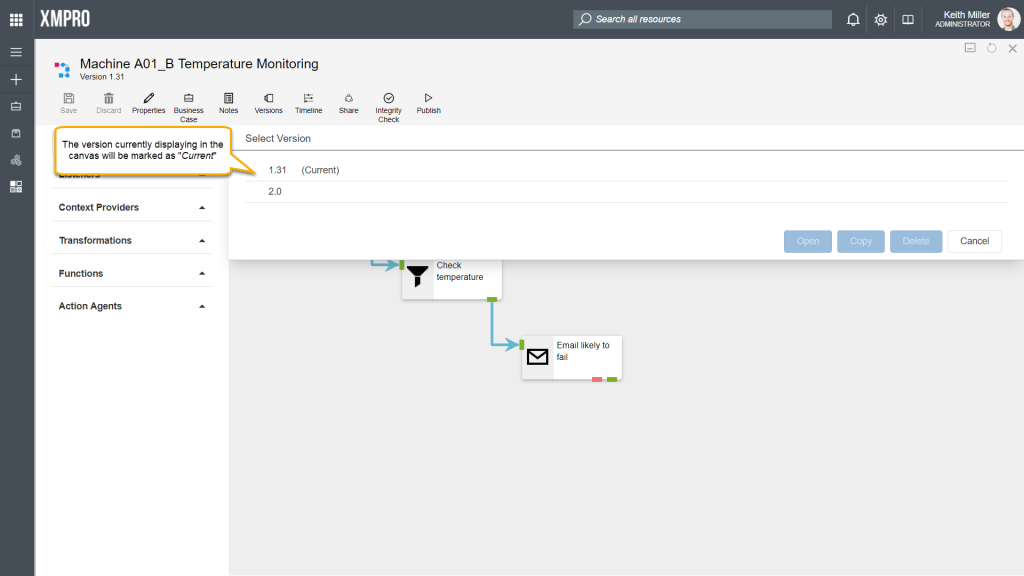
Click on “Versions” again. Note that the version currently displaying in the canvas will be marked as “Current“.
Copying versions
To copy a version of the stream, select the version and click on “Copy“. The new copy will be created, set as the current version, and will have a version number higher than all the other versions of the stream. Thus, a major version increase will be done, e.g. if the version you copied is Version 2.35, but the latest version is Version 3.80, the newly copied version of the data stream will be Version 4.0.
Deleting versions
To delete a version of a stream, select the version from the list and click “Delete“.
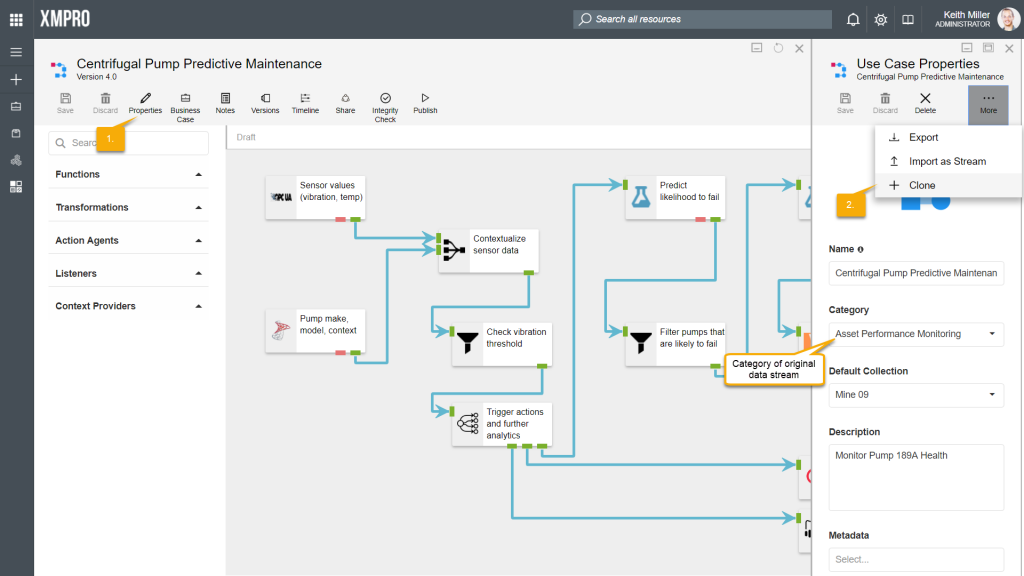
Cloning Streams
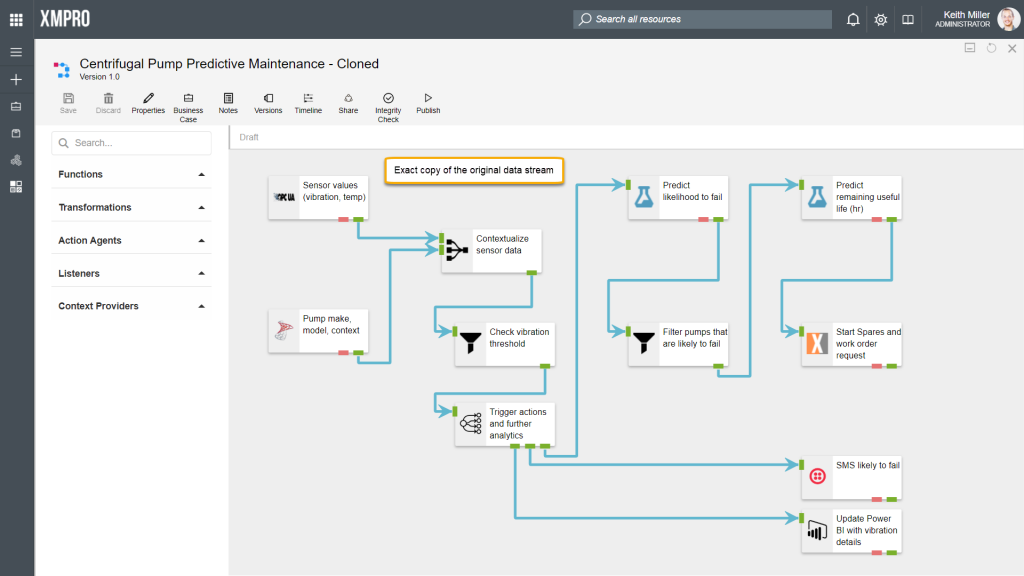
Cloning a data stream would result in the latest version of a data stream being copied exactly to a different category. Thus, an identical data stream will be created in a different category than the original data stream, but the new data stream will only contain a copy of the latest version of the original data stream. Any other versions that the original stream may have contained, will not be copied.
To clone a data stream, follow the steps below:
- From within the data stream canvas, click on “Properties“.
- Click on “Clone“. This button may not initially be visible in the Properties page, but can be found in the menu that appears if you hover with your mouse cursor over the “More” button.
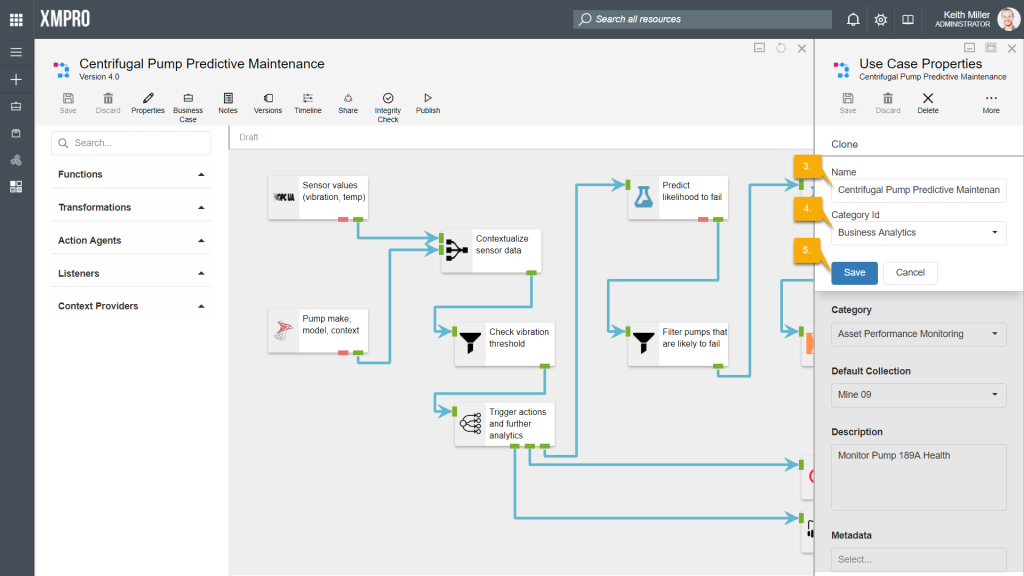
- Specify a name for the data stream.
- Choose a category to copy the data steam to. Please note that this should not be the same as the category of original data stream.
- Click Save.
Import and Export Streams
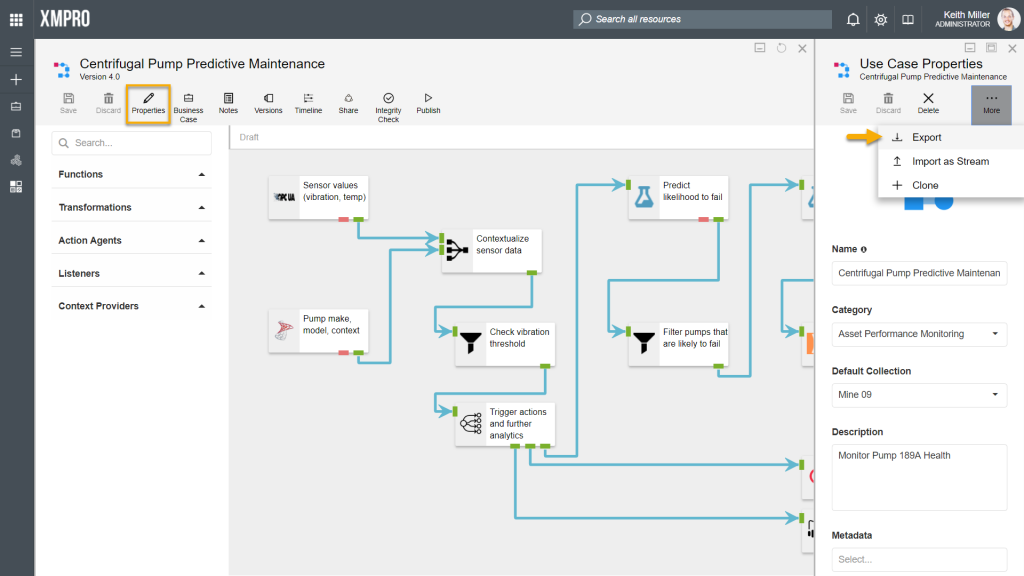
Exporting streams
Data Stream Designer allows for data streams to be exported as a file with an “.xuc” extension. This functionality is made available on Properties page, which can be accessed from the Canvas. When a stream is exported, only the latest version will be exported. Thus, if someone would import the stream, it will be assigned a new ID and contain only one version – the latest version of the stream that was exported.
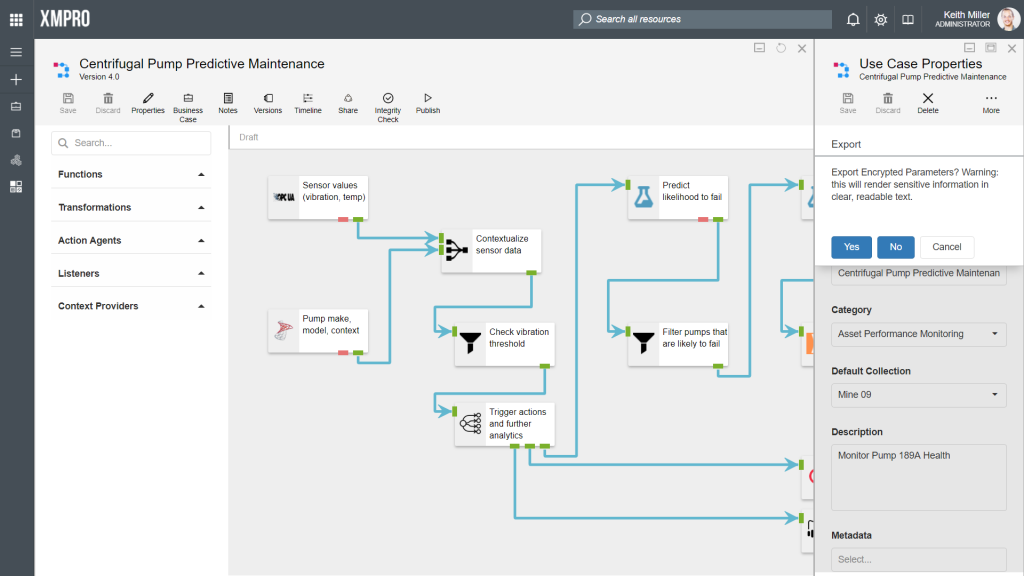
Before the file containing the exported stream will be created and downloaded, you will be asked if you would like to export encrypted parameters. Encrypted parameters in a data stream consists of any secure values, such as passwords, contained in the agents in your stream. If you choose not to export any encrypted values, the person that imports the stream would have to configure all the secure values before he/ she will be able to use the stream.
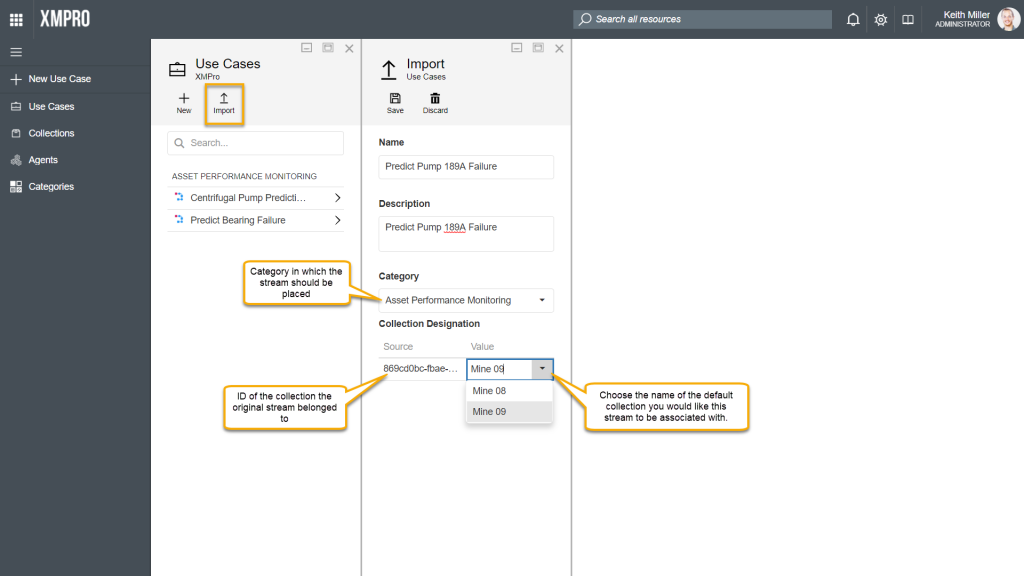
Importing streams
Importing streams is done from a different location as exporting streams. To import streams, you need to open the Use Cases page, click on “Import“, configure the stream details and click “Save“.
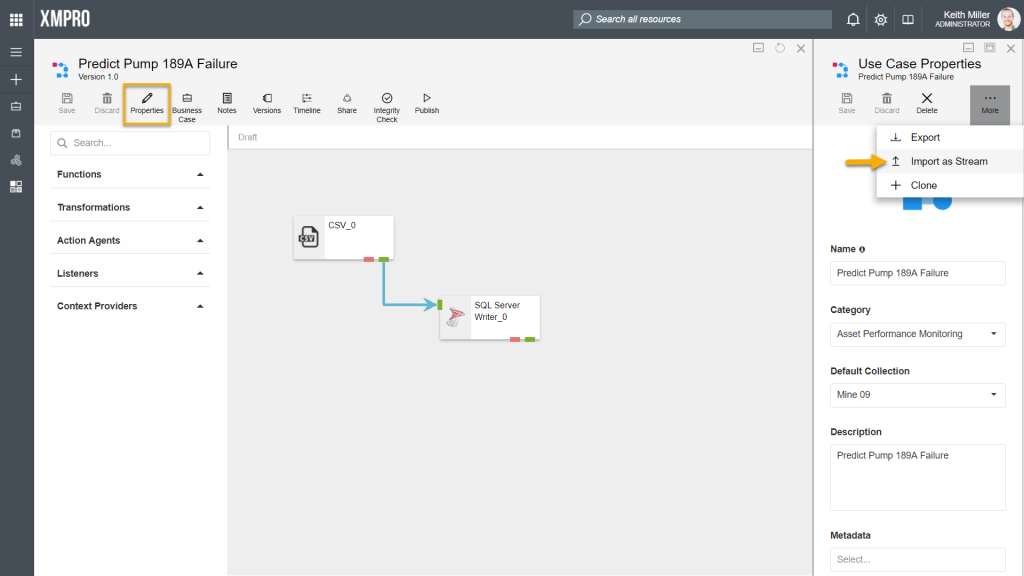
Importing versions of streams
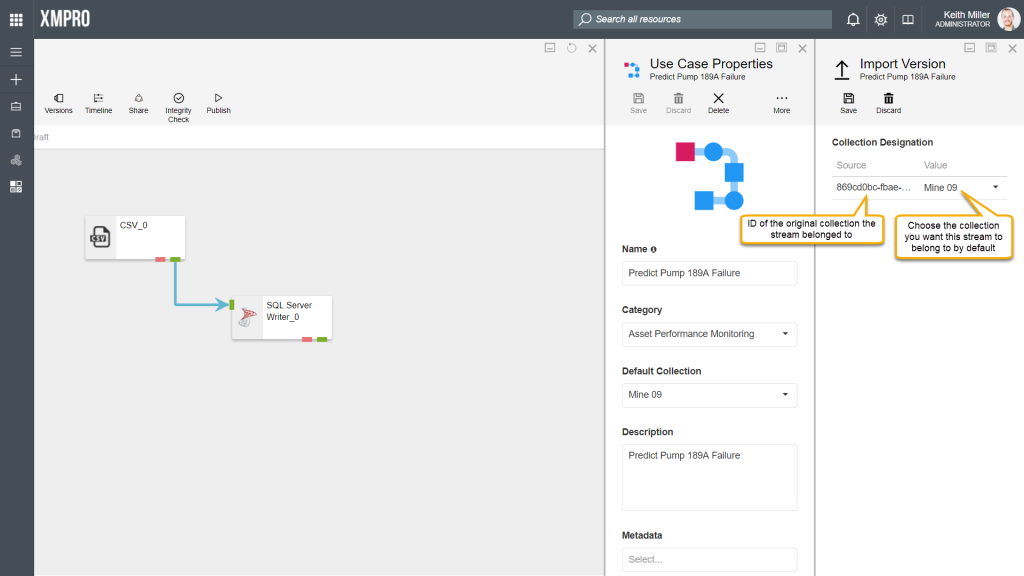
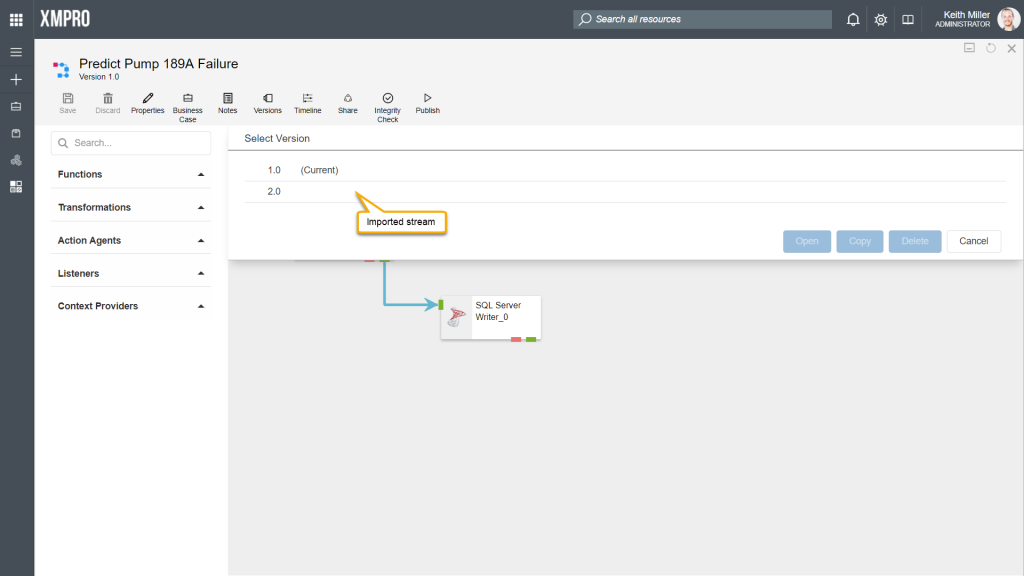
Data streams can be imported as versions of another stream by using the Import as Stream option, for example,
- Consider having a stream called “Predict Pump 189A Failure“.
- Import a stream by clicking on “Import as Stream” on the Properties page and upload a valid “.xuc” file, which contains a stream.
- The newly uploaded stream will be listed as a new version of the existing stream and be set to be the latest version.
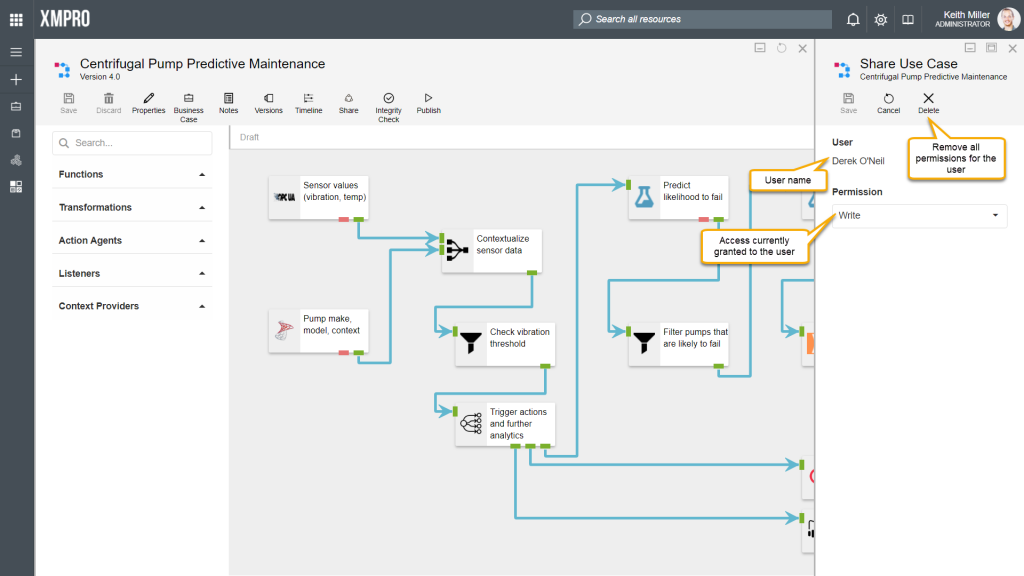
Sharing Streams
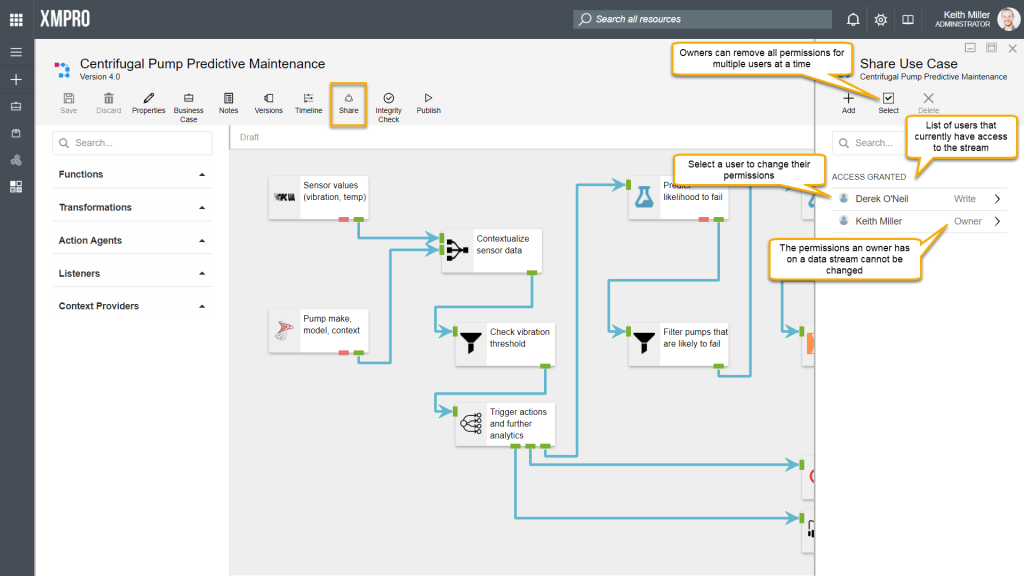
Whether or not you can access a data stream in Data Stream Designer is determined by the permissions that you have on that particular data stream. The person that originally created the stream, will be listed as the owner and can never loose his/ her right to access the stream, unless the stream is deleted. Other users can then be assigned read or read-and-write access.
Permissions: Owner
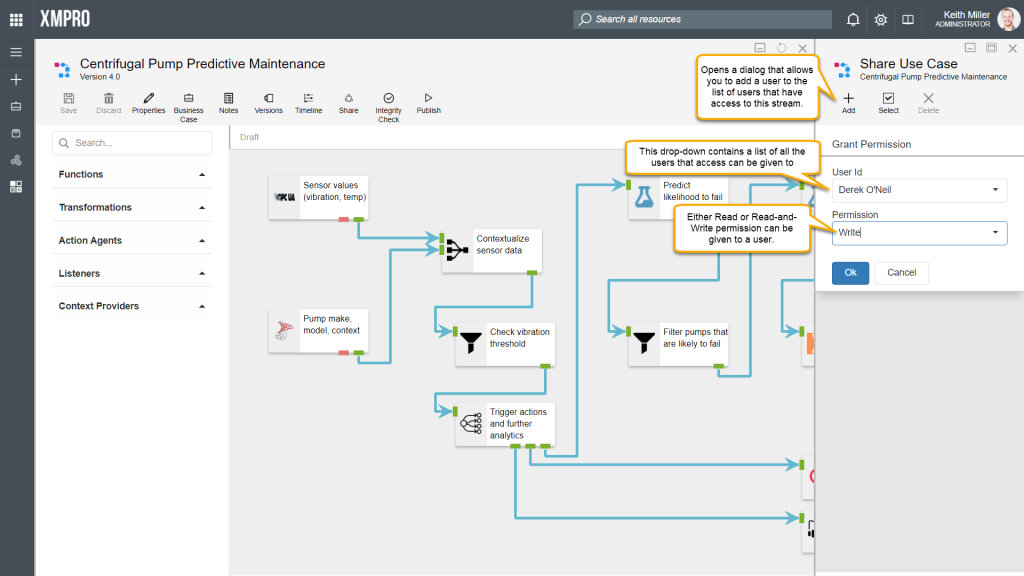
The owner of a data stream has full permission to make any changes required to the data stream. The owner is also allowed to give other users access to the data stream or change the permissions of existing users.
Permissions: Read
Read permission will allow a person to view, publish, and unpublish a data stream, but changing any part of the stream will be prohibited.
Permissions: Write
A person who has Write access on a data stream will be allowed to view, edit, publish, unpublish or delete the data stream.
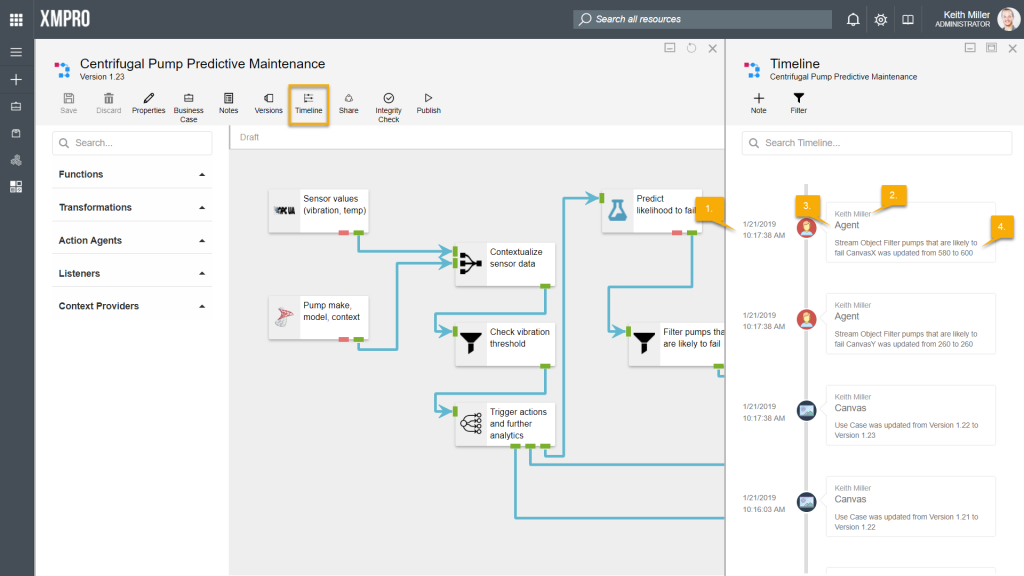
History: Timeline
All changes that are made in any stream are recorded and stored in the database. These changes can be viewed from the canvas by clicking on the “Timeline” button. Every time an event occurs, it will be added to a timeline in the form of a block, displaying the following:
- Time and date the change occurred.
- Name of the person that made the change.
- Area where the change was made, for example, “Agent”.
- Description of the change.
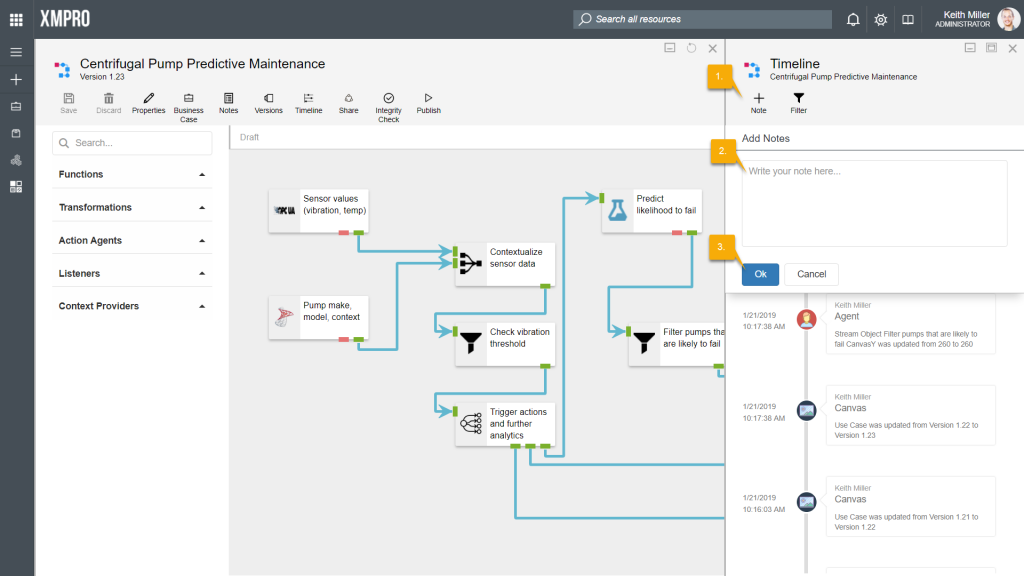
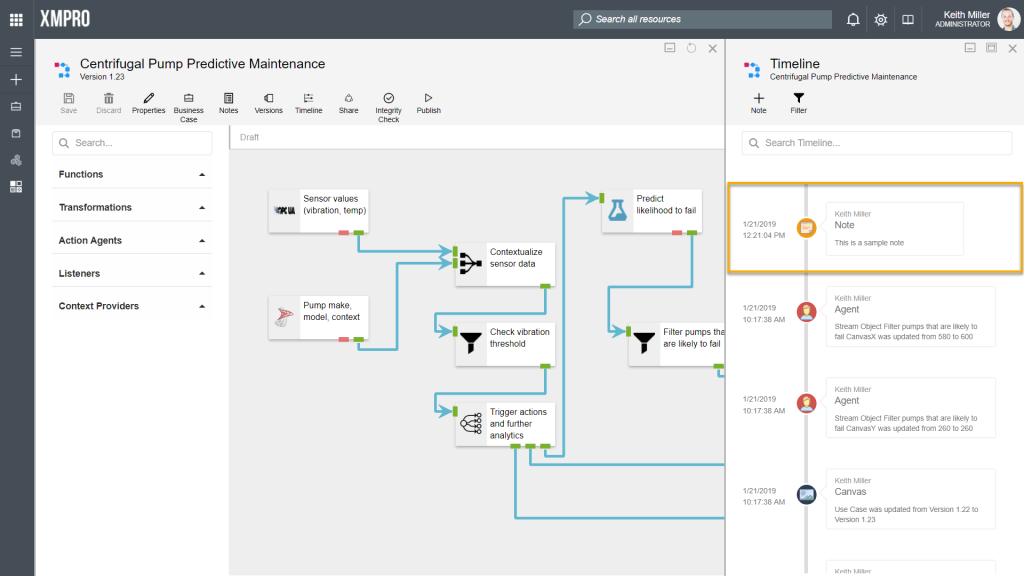
Adding Notes
Most of the items added to the timeline are added by the system itself, for example, if the version of the stream increased or if someone changed a setting or configuration of one of the agents. However, it might occasionally be needed to add additional notes to the timeline. To add notes to the timeline, click on the “Note” button, type the notes you would like to add and click “Ok“.
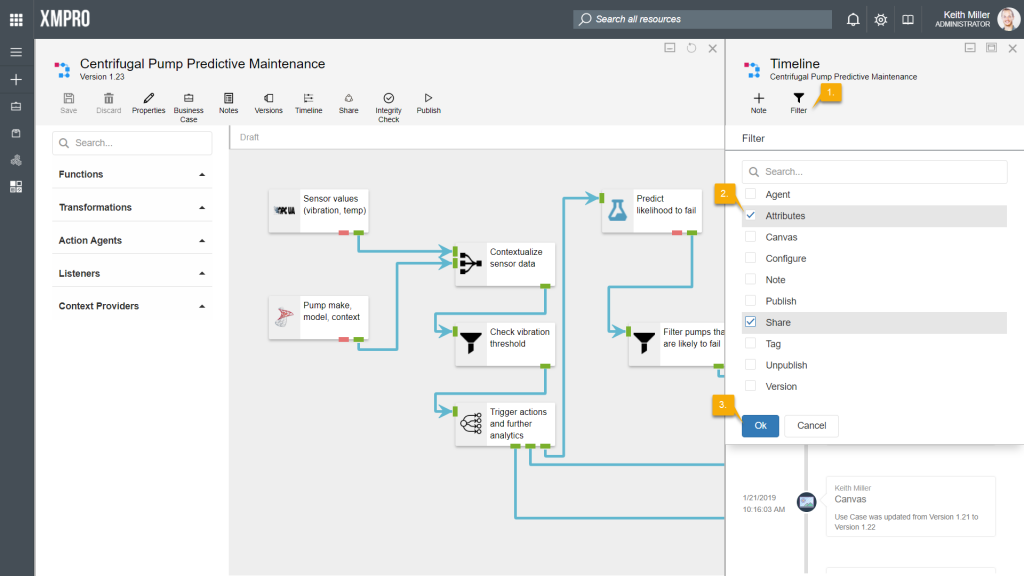
Filtering
Filtering can be applied to the timeline, based on the type of the events logged, for example, changes that are made to agents or version numbers that have been increased. Each type that filtering can be applied on is named after the element on which the change was made. The types of events that filtering can be applied on are as follows:
- Agent
- Attributes
- Canvas
- Configure
- Note
- Publish
- Share
- Tag
- Unpublish
- Version
To apply filtering on the timeline, follow the steps below:
- Click on Filter.
- Select the type of items you would like to display.
- Click OK.
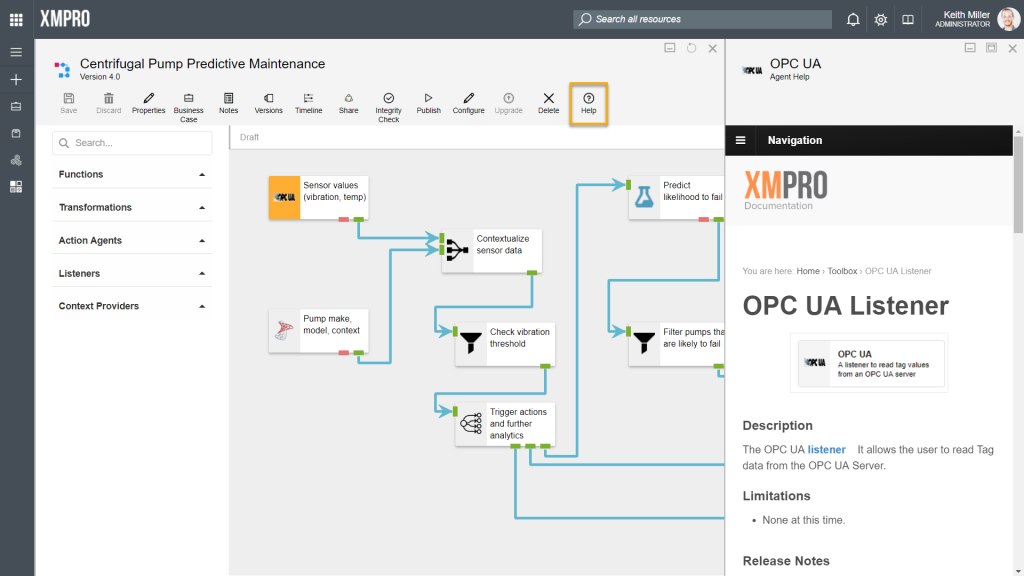
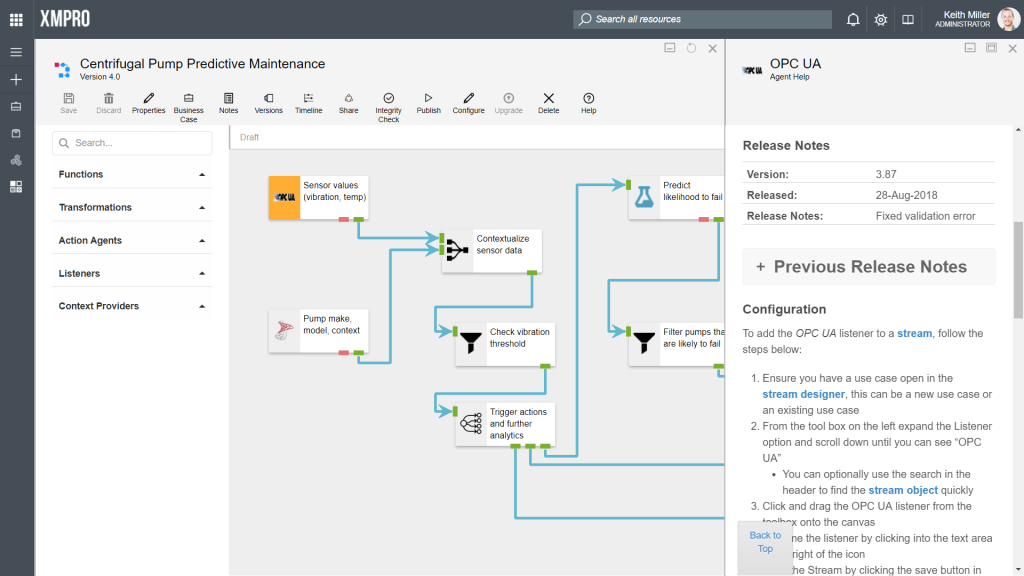
Finding Help
Help documentation is written for each agent that is created. If you are unsure about how a specific agent works, click on the agent and then click on the “Help” button. The page that will open will contain information such as release notes and instructions on how to configure the selected agent.