Description
Provides context or reference data, originating from an OSIsoft PI system, to the rest of the data stream.
Prerequisites:
- PI AF Server should be installed prior to using the OSIsoft Context Provider.
- PI Data Archive Server should be installed prior to using the OSIsoft Context Provider.
- PI Web API needs to be installed and running along side OSIsoft PI Server prior to using the OSIsoft Context Provider.
Configuration
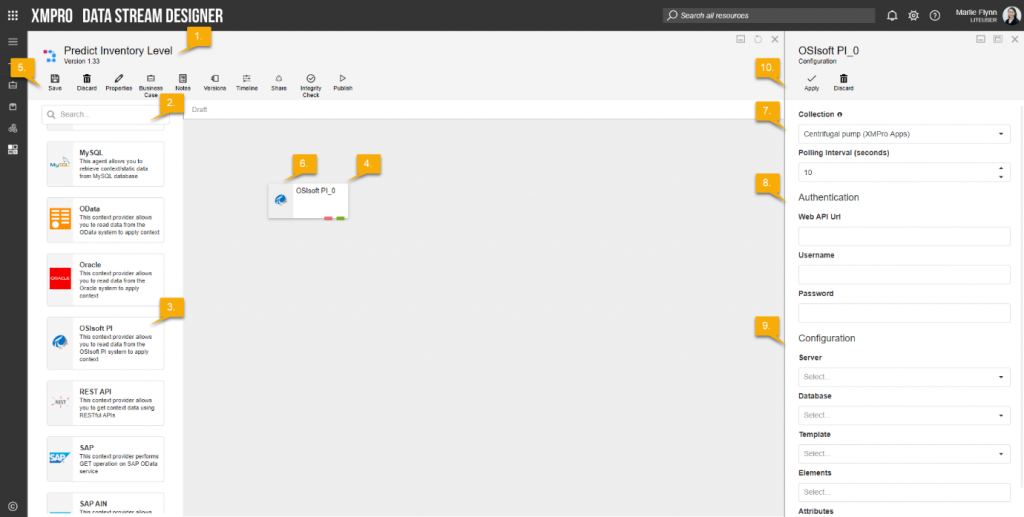
To add the OSIsoft PI Context Provider to a stream, follow the steps below:
- Ensure you have a use case open in the stream designer, this can be a new use case or an existing use case
- From the toolbox on the left expand the Context Provider option and scroll down until you can see “OSIsoft PI Context Provider”
- You can also use the search in the header to find the agent quickly
- Click and drag the OSIsoft PI Context Provider from the toolbox onto the canvas
- Rename the Context Provider by clicking into the text button on the action bar
- Save the Stream by clicking the save button in the action bar
- Hover over the icon for the agent until it turns orange and then double click to open the configuration page
- You can optionally use the configure option on the action bar once you have selected the specific agent and then clicking this option
- Configuration options
- The drop-down allows you to associate this agent with a specific collection. The default option is derived from the default specified against the specific use case and is generated left as the same option. If you do need to change it to another collection make the change by selecting the new collection in the drop-down.
- Enter a value for the Polling Interval (the interval at which new records are accessed/checked for, in seconds)
- Enter Authentication details
- Enter the Web API Url
- Enter the Username
- Enter the Password
- Enter Configuration details
- Select Server from drop-down list
- Select Database from drop-down list
- Select Template from drop-down list
- Select Elements from drop-down list
- Select Attributes from drop-down list
- Click Apply on the action bar, and then save the stream using the save button.
Limitations
- None
Release Notes
| Version: | 1.23 |
| Released: | 16-Jan-2020 |
| Release Notes: | Fixed the error on Elements drop-down. |
| Version | Released | Release Notes |
| 1.22 | 09-Aug-2019 | Replacing hyphen with underscore in output properties. |
| 1.21 | 02-Aug-2019 | Returning the values only if they are Good, otherwise returning null. |
| 1.20 | 01-Aug-2019 | Agent made Non-Virtual; Added option to select Attributes. |
| 1.16 | 4-March-2019 | Updated help URL. |
| 1.15 | 13-Aug-2018 | Added error endpoint. |
| 1.14 | 08-June-2018 | Updated help URL. |
| 1.0 | 19-March-2018 | Initial Release. |