Description
Allows you to send data to the Confluent Kafka platform.
Limitations
- None at this time
Release Notes
| Version: | 1.13 |
| Released: | 4-March-2019 |
| Release Notes: | Updated help URL |
| Version | Released | Release Notes |
| 1.12 | 13-Aug-2018 | Added error endpoint. |
| 1.11 | 16-May-2018 | Added validation. |
| 1.0 | 23-March-2018 | Initial Release. |
Configuration
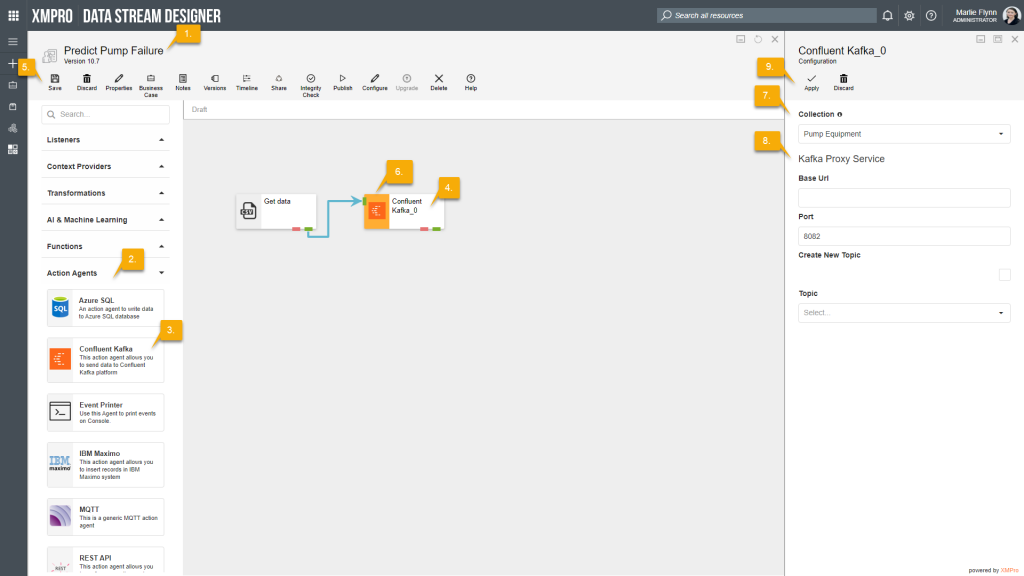
To add the Confluent Kafka Action Agent to a stream, follow the steps below:
- Ensure you have a use case open in the stream designer, this can be a new use case or an existing use case
- From the toolbox on the left expand the Action Agents option and scroll down until you can see “Confluent Kafka”
- You can also use the search in the header to find the agent quickly
- Click and drag the Confluent Kafka action agent from the toolbox onto the canvas
- Rename the action agent by clicking into the text area to the right of the icon
- Save the stream by clicking the save button in the action bar
- Hover over the icon for the agent until it turns orange and then double click to open the configuration page
- You can also click on the configure option in the action bar after selecting the agent
- Configuration options
- The Collection drop-down allows you to associate this agent with a specific collection. The selected option would be, by default, the same as the collection that was selected for the use case. If you do need to change it to another collection, select a different collection from the drop-down.
- Kafka Proxy Service options
- Add the URL that you would like to connect to in the space provided under “Base Url” label.
- Specify the port that you would like to use.
- If you would like to create a new topic, select the “Create New Topic” checkbox and specify the name of the new topic in the “Topic Name” text box, or
- If you would not like to create a new topic, leave the “Create New Topic” checkbox unchecked and select a topic you would like to use from the drop-down.
- Click Apply on the action bar, and then save the stream using the Save button