Description
Provides context or static data, originating from an Azure SQL database, to the rest of a data stream.
Configuration
To add the Azure SQL Context Provider to a stream, follow the steps below:
- Ensure you have a use case open in the stream designer, this can be a new use case or an existing use case
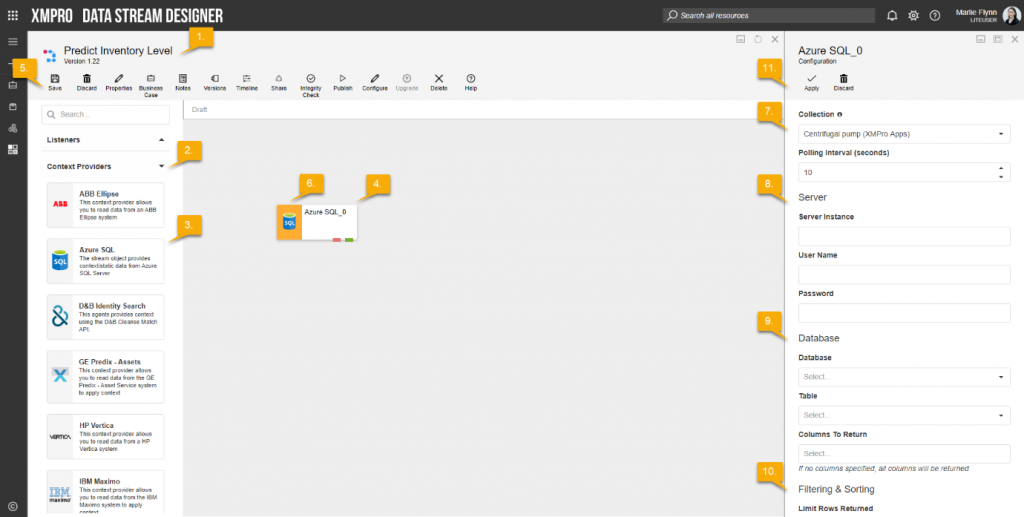
- From the toolbox on the left expand the Context Provider option and scroll down until you can see “Azure SQL Context Provider”
- You can also use the search in the header to find the agent quickly
- Click and drag the Azure SQL Context Provider from the toolbox onto the canvas
- Rename the Context Provider by clicking into the text button on the action bar
- Save the Stream by clicking the save button in the action bar
- Hover over the icon for the agent until it turns orange and then double click to open the configuration page
- You can optionally use the configure option on the action bar once you have selected the specific agent and then clicking this option
- Configuration options
- The drop down allows you to associate this agent with a specific collection. The default option is derived from the default specified against the specific use case and is generated left as the same option. If you do need to change it to another collection make the change by selecting the new collection in the drop-down.
- Enter a value for the Polling Interval (the interval at which new records are accessed/checked for, in seconds)
- Enter Server details
- Enter the Server instance
- Enter the User Name
- Enter the Password
- Enter Database details
- Select Database from drop-down list
- Select Table from drop-down list
- Select Columns To Return from drop-down list. If no columns specified, all columns will be returned.
- Enter Filtering & Sorting details
- Enter Limit Rows Returns. If not specified, all qualified rows will be returned.
- Add Filters by adding conditions. Multiple condition groups could be specified.
- Enter Sort By conditions. Column name and Order need to be specified.
- Click Apply on the action bar, and then save the stream using the save button.
Limitations
- None at this time.
Release Notes
| Version: | 3.12 |
| Released: | 22-Oct-2019 |
| Release Notes: | Incorporate changes to Filter agent. |
| Version | Released | Release Notes |
| 3.11 | 09-Sep-2019 | Added a filter option. |
| 3.1 | 22-Aug-2019 | Added option to specify columns to return and sort order. |
| 3.05 | 4-March-2019 | Updated help URL. |
| 3.04 | 13-Aug-2018 | Added Error endpoint. |
| 3.03 | 07-Aug-2018 | Removed validation on Database to cater for SQL logins that don’t have access to query master database. |
| 3.02 | 02-Aug-2018 | Changed Database drop-down to allow custom values so that user can specify database name manually, which is needed when login doesn’t have permission to query master database; modified the error handling accordingly. |
| 3.01 | 27-June-2018 | Validation bug fixed. |
| 3.0 | 06-June-2018 | Initial Release |