The purpose of the Report Designer wizard is to provide a fully integrated tool to create XMPro reports. DevExpress XtraReports are used to provide this functionality. Access the Report Designer from the XMDesignerIs used to configure XMPro BPM solutions., Wizards tab, Report Designer.
XMDesigner
Open XMPro Report Designer
This procedure describes how to open the XMPro Report Designer using the XMDesigner.
If the Report Designer is grayed out, contact your Site Administrator.
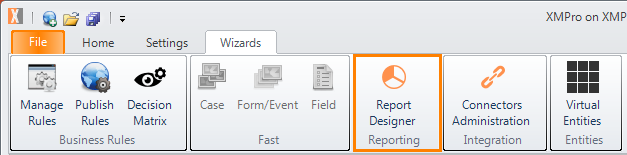
- On the ribbon, click the Wizards tab, click Report Designer from the Reporting Group in XMDesigner. The XMPro Report Designer opens.

Create a New Report
This procedure describes how to create a report in the XMPro Report Designer.
A new report can be created by one of two methods as follows:
- New Report [Blank]
- New Report via Wizard
These options are available from the New Report menu on the Report Designer tab.
Create a New Report via Wizard
This procedure describes how to create a new report via the wizard in the XMPro Report Designer.

- Click the New Report drop-down from the Report Designer tab.
- Click New Report via Wizard option from the Report Designer tab.
- (Not shown) Select the relevant report from the Report Wizard. For example, Empty Report, Data-bound Report, or Label Report. Go to the relevant procedures below.
Create an Empty Report
This procedure describes how to create an empty report via the wizard in the XMPro Report Designer.

- Click Empty Report (by default the report is named XtraReport).
- Click Finish. The Empty Report opens as shown in the following figure.

Create a Data-Bound Report – Database
This procedure describes how to use an SQL data source to bind a report to a database in the XMPro Report Designer.

- Click Data-bound Report from the Report Wizard.
- Click Next.

- Click the Database data source type from the Report Wizard.
- Click Next.

- Specify whether you want to use an existing data connection or create a new data connection. Click No, I’d like to specify the connection parameters myself or Yes, let me choose an existing connection from the list radio button.
- Click Next.
Note: Cannot connect to the database. See the details below. A network related or instance-specific error occurred while establishing a connection to SQL Server. The server was not found or was not accessible. Verify that the instance name is correct and that the SQL Server is configured to allow remote connections. (provider: SQL Network Interfaces, error: 26 – Error Locating Server/Instance Specified).

- Define a custom connection string, or select from the supported data source types. Depending on the data provider selected, it may be necessary to specify additional connection options (such as authentication type and database name) on this page.
- Click Next.
- Select the data provider and specify the connection properties.
- Click Finish.
- On the ribbon, click the Print Preview tab to view the report in the Report Designer or to view the report in XMWorkspace, see Deploy a Report in XMDesigner.
Create a Data-Bound Report – Entity Framework
This procedure describes how to connect to an Entity Framework data source defined from an external assembly containing the required context.
- Click Data-bound Report from the Report Wizard.
- Click Next.

- Click the Entity Framework data source type from the Report Wizard.
- Click Next.

- Select an existing data context from the list or browse for an assembly.
- Click Next.
Note: You can also use an external assembly containing the required context. To do this, click the Browse and locate the required assembly. Select the required data context from this assembly and click Next.

- On the final page, choose the connection string corresponding to the selected data context and click Finish.
If the application configuration file does not contain the required connection string, or you need to specify the connection string manually, select No, specify a custom connection string and click Next.
NEED NEW SCREENSHOT FROM GAVIN

- On this page, specify a custom connection string and click Finish. This creates the data source and displays its fields in the Field List.
- (Not shown) On the ribbon, click the File tab, click Save or press CTRL+S to save your changes.
- On the ribbon, click the Print Preview tab to view the report in the Report Designer or to view the report in XMWorspkace, see Deploy a Report in XMDesigner.
Create a Data-Bound Report – Object Binding
This procedure describes how to connect to an object data source defined in a separate class.
- Click Data-bound Report from the Report Wizard.
- Click Next.

- Click Object Binding from the Report Wizard.
- Click Next.

- Select the assembly containing the class type definition of a data source from the Report Wizard.
- Click Next.
For instance, this can be a custom class providing the required data or any TableAdapter used to query a database.

- Select a data source type.
- Click Next.

- Select a data binding mode (Retrieve the data source schema or Retrieve the actual data).
- Click Next.

- Select the columns you want to display in your report. Click the relevant fields in the Available fields list.
- Click > to add to the Fields to display in a report field.
- Click Next.

- Create multiple groups, each with a single field value, or define several fields in the same group. Click the relevant fields in the Available fields list.
- Click > to add to the Fields to display in a report.
- Click Next.

- Click the relevant report layout (Portrait or Landscape).
- Click the relevant report arrangement, for example, Stepped, Outline 1, Outline 2, Align Left 1, or Align Left 2.
- Click Adjust the field width so all fields fit onto a page check box.
- Click Next.

- Click a report style that specifies the appearance of your report, for example, Bold, Casual, Corporate, Compact, or Formal.
- Click Next.

- Enter the report title.
- Click Finish.
- (Not shown) On the ribbon, click the File tab, click Save or press CTRL+S to save your changes.
- (Not shown) On the ribbon, click the Print Preview tab to view the report in the Report Designer or to view the report in XMWorspkace, see Deploy a Report in XMDesigner.
Create a Label Report
This procedure describes how to create a label report in XMDesigner.

- Click Label Report from the Report Wizard.
- Click Next.
 Select the relevant Label product from the drop-down.
- Select the relevant Product Number from the drop-down.
- Click Next.

- Click the Label’s parameters to adjust, if required.
- Click Page Size to change the page size of your report, if required.
- Click Finish.
- (Not shown) On the ribbon, click the File tab, click Save or press CTRL+S to save your changes.
- On the ribbon, click the Print Preview tab to view report in the Report Designer.
- To view report in XMWorspkace, see Deploy a Report in XMDesigner.
XMPro Report Designer
Standard Controls
A report control is an element that is intended to display specific information in your report, such as static or dynamic text, pictures, a bar code, a check box, etc.
The following control types are available:
Add Report Controls
This procedure describes how to add report controls in the XMPro Report Designer.

- Drag an appropriate item from the Standard Controls menu tab.
- Drop it on a report’s surface as indicated in the previous figure.
- Click the Report Explorer. The properties of this control are provided in the Property Grid window. Change as required.
Add Parameters
This procedure describes how to add parameters to a report in the XMPro Report Designer.

- (Not shown) In the Report Designer, click Field List tab.
- Right-click the Parameters section and select Add Parameter.

- Provide a name and type for the parameter and optionally a default value.
- Click OK.
- (Not shown) On the ribbon, click the Report Designer tab, click Save or press CTRL+S to save your changes.
Parameters can be appended to the Report Link URL in the ActivityA specific step in a process. It will be the user interface for that step (web form or a screen), for example, the Leave Application (screen interface or web form) will be the first Activity in the Leave Requisition process. The Leave Application Authorization will be the second step or Activity in the Leave Requisition process. One Process can have multiple activities., but this must be done using a script.
Display a Report in XMDesigner
This procedure describes how to display a report in XMDesigner.
- Access the Fast Field Editor by double-clicking the Reference Label control.
- Remove the Width setting.
- Remove the Caption.
- Give it a relevant name.
- Drag a new Reference Label control onto the activity.
- In XMDesigner, open the particular Activity you would like to display the report on.
- Check the OnLoad box under the Behaviour section.
- Select the Report Link radio button.
- Enter the Report Name (this should match the name of the report setting created earlier).
- Set Width to 100%.
- Select the database connection to use.
Deploy a Report in XMDesigner
This procedure describes how to deploy a report in XMDesigner.
The following prerequisites must be met to deploy a report.
Prerequisites
- Create an Activity from the XMDesigner.
- Configure the properties using the Activity Configuration Wizard.
- Right-click the Activity and select XMPro Wizard.
- Ensure that the Static field contains the Report: keyword. For example, Report: Loan Application Dashboard.
- Configure the Routing Type and Routing Group.
- Click Advanced tab.
- Select the Trigger Style.
- Click OK.
- On the ribbon, click the File tab, click Save or press CTRL+S to save your changes.

- On the ribbon, click the Settings tab in XMDesigner.
- On the ribbon, click Reports in the Custom Settings group. The customSettings\XMPro\Reports directory displays a list of existing Reports.
- Click Setting and provide the values as follows:
- Name: This should match the filename of the report file but should exclude the “.repx” extension. e.g., For a report file SalesReport.repx, the setting should be SalesReport
- Value: This should contain the full physical path to the report file including the “.repx” extension
- Type: This should be set to “value”
- On the ribbon, click the File tab, click Save or press CTRL+S to save your changes.
Rebuild Report Dataset
This procedure describes how to rebuild the report dataset in the XMPro Report Designer.
When the underlying data source changes, the Data Set needs to be rebuilt as follows:

- In Report Designer, delete the existing Dataset and Table Adaptor.
- Open the Data Source drop-down from the Property Grid and select Add New DataSource.
- Run the Report Wizard and configure the data source.
Once the data set has been rebuilt the new or changed fields can be added to the report.
Existing fields should not need any changing unless the underlying dataset field names have been changed.
XMWorkspace
Open Report
This procedure describes how to open a report in the XMWorkspace.

- From the XMWorkspace, click Insight > User Reports.
- Click the relevant report to view your design changes in the XMWorkspace, for example, Supplier List.
Report Toolbar and Controls
| Print report | Click to print the current report. | |
| Print current page | Click to print the current page. | |
| First page | Click to navigate to the first page. | |
| Previous page | Click to navigate to the previous page. | |
| Page number | Click to select the page number to display. | |
| Next page | Click to navigate to the next page. | |
| Last page | Click to navigate to the last page. | |
| Export report & save | Click to export the report and save it to a disk based on Report File Format. | |
| Export report & show | Click to export the report and show it in a new window based on Report File Format. | |
| Report file format | Click to export the report as:
|
|
| Click to email the PDF report using your default email client. | ||
| Open Report | Click to open the selected report. | |
| Refresh Reports | Click to refresh the reports listed. |