The XMAutomate Service has three configuration modes as follows:
- The first configuration mode allows you to schedule tasks on a daily, weekly, monthly or yearly basis. These tasks appear in the relevant user’s Task List in the XMWorkspace at the scheduled intervals.
- The second configuration mode allows you to start processes based on files that are placed in a specified designated folder (and map the contents of the file to XMPro objects within a specified activityA specific step in a process. It will be the user interface for that step (web form or a screen), for example, the Leave Application (screen interface or web form) will be the first Activity in the Leave Requisition process. The Leave Application Authorization will be the second step or Activity in the Leave Requisition process. One Process can have multiple activities.).
- The third configuration mode allows a process to be started by monitoring a specific email account.
Configuring the XMAutomate Service
Before you can configure the XMAutomate service/s you need to make sure the MMC application has also been installed.
The MMC allows for the management and configuration of the XMAutomate as well as the XMAlert services.

- Double-click the XMPro Configuration in the left-hand panel (or click the arrow on the left) and double-click the XMAutomate below it (or click the arrow on the left).
- The settings form for the XMAutomate Service will display on the right.
- Complete the Site URL and login details as well as adjust the polling interval as required. The configuration time is in seconds (300 seconds = 5 minutes)
- Click Save. This sequence only needs to be completed the first time a new service is installed.
Time-Based Events

- Right click on TimeBased and click on Add Event in the popup menu.
- Activity Event will appear below Time Based and in the right-hand panel. Click on Activity Event below Time Based or double click Activity Event in the right-hand panel.

- A time-based event definition form will now appear. Fill in this form in order to create and schedule a task. Click Save when you are finished.
- Select the Activity Name to trigger when the specified recurrence setup is met.
File-Based Events

- Right click on FileSystem and click on Add Event in the popup menu.
- New EventDefinition 0 will appear below FileSystem and in the right-hand panel. Double click New EventDefinition 0 in the right-hand panel. An Activity Settings form will now appear.

- Select the Activity Name from the dropdown, browse to the monitor path.
- There are two file types that can be monitored: XML and CSV.
- Next select the File Object contained in the activity selected. This is required to load the original document (can be access through the process as required).
- The file Identifier is an optional field that can be used to only monitor for files with the specified name prefix.
- Once done click Apply, then Add ObjectGroup.
- New ObjectGroup 0 will now appear underneath the name of the new activity. Click on New ObjectGroup 0. The ObjectGroup Settings panel will now appear.

- You need to map at least the Default (0) Object Group
- The GroupNode being used in reference to the source XML file. RepeatingNode is used when populating an object group using a common node in the XML.
- Example XML file and mappings:


- Click Apply, then Add Object
- The name of the object group will appear beneath the name of the activity, and New Object 0 will appear below that. Click on New Object 0 and the Object Settings panel will appear.
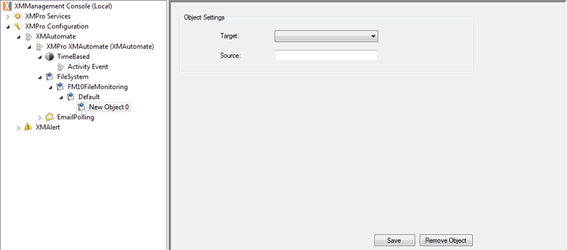
- Map the first object to the respective control within the selected activity as well as the source within the file.
- Click Save.
- Right-click on Default and Add Object to add additional objects to a map.

Email-Based Events

- Right-click on EmailPolling and click on Add Event in the popup menu.
- New EventDefinition 0 will appear below EmailPolling and in the right-hand panel. Double click New EventDefinition 0 in the right-hand panel. An Activity Settings form will now appear.

- The URL needs to map to the exchange server
- The selected Exchange versions currently supported are:
- Exchange 2007 SP1
- Exchange 2010
- Exchange 2010 SP1
- The username and password for the specified email account being monitored need to be added.
- The subject matches can be used to filter specific emails out for different activities.
- The activity being triggered needs to have configured:
- Attach email – file attachment control
- From – control to store the from details
- CC – control to store the cc details
- Subject – control to store the subject details
- Body – control to store the body details
- Attachment’s – Object Group
- Attachment – control to store the attachments contained within the above Object Group
- The delete email flag is optional.
- Click Apply.